I don’t think I’ve mentioned it here yet, but I’m currently in the middle of developing a new Blackberry game that I hope to have on App World when I’m complete (as I get closer to completion I’ll put some screen shots up). I’ve always wanted to put an application or game up on one of the mobile stores, not so much to make any significant amount of money (which I won’t), but just to get the program into more people’s hands easily. We’ll see how it goes – but until then, onto the point of this article.
One of the things I ran into on this game (and others) is the need to generate binary files – specifically in this case, level data that dictates where and when objects are in the game, their effects, behaviors, etc. While there is always the option to create a text file to hold this data, this can be problematic in many ways. First, the data you need to store may actually be binary data that doesn’t lend itself to text conversion – also, more handling to read the file (encoding, line feeds, parsing), larger files (which is a concern on devices with little storage like older Blackberrys), and no obfuscation to the end user (which kind of takes the fun out of the game if they can open up this file easily and read where everything is). Binary files are definitely the way to go. And while sometimes it makes sense to make a level editor that will generate the binary files, in some instances you may not have the time or resources to accomplish this. It would be nice to have a tool to generate these files so you don’t have to go hexediting for hours to make a 1K file.
Excel at Creating These Files!
I find Microsoft Excel to be an extremely useful tool in so many situations, especially those where I need to bang out results quickly. Past the normal math, accounting, and analysis capabilities, Excel is awesome for generating files that depend on working with lots of imported data, such as script files and, in our case, binary data files.
In my example, each object had 7 values associated with it. And with some of these values being 2 bytes in size, this came out to 12 or so bytes I would have to enter hex code in with an editor, per object. If I wanted 500 objects, thats 6K of writing hex values. No thanks. It would be much easier to write these values into Excel cells (even auto-generating many of them using Fill-Down with an equation). Then, using VBA (Visual Basic for Applications) that’s built into Excel, dump the contents of the cells out into the binary format I want them in. So let’s see how to do that.
Settings Up Your Sheet
This is the simple part. For this example, I have created a fictional game called “Just Desserts” in which each level consists of a screen filled with desserts and vegetables, and you must eat the various cakes, pies, and puddings but avoid carrots and celery. Our data file that describes each level has 4 values per entry.
Value 1: What level this food is on
Value 2: The ID of this food (E.g. 1=cake, 2=pie, 3=pudding, 4=celery, 5=carrot)
Value 3: X coordinate on screen of this food
Value 4: Y coordinate on the screen of this food
Here’s what an example spreadsheet would look like:
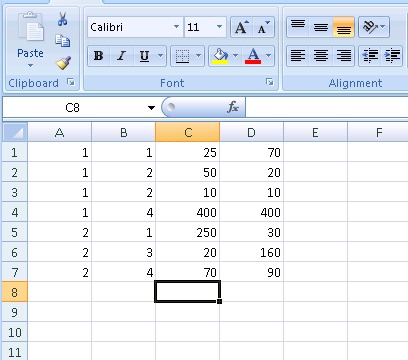
So each row is an object, and each column is one of the values. In our example above, we see on level one we should create a cake at coords (25,70), a pie at (50,20) and another at (10,10), and a celery at (400, 400). On level 2, we should create a cake at coords (250, 30), a pudding at (20,160), and a celery at (70,90). You can manually enter your data in, or use the power of excel and generate the data using a formula – it’s up to you. Once your data is in your spreadsheet, then comes time to turn it into a binary file that can be used by your game.
Macro Time
The power of Excel is increased 10-fold by the ability to include programs in your spreadsheets. Excel uses Visual Basic to accomplish this. By creating a new macro, you can attach a Visual Basic function to it that gets called whenever your macro is. In Excel 2007, Macros are under the View tab. After you create a new one, you are presented with a code editor where you can write your VB function.
Below is the example VB function that would work with the above data and pump it out into a file. Please note – one thing you may run into depending on what language you’re working with, and what architecture, is a little/big endian conflict. VBA pumps out little-endian, but since I was creating a BB game in Java, it expects big endian. I included how to do this inline below, though you could make a function out of it as well.
Sub GenDatFile()

   Dim TempByte as Byte ' Holds 1 byte
   Dim TempInt as Integer ' Holds 2 bytes

   ' Specify the path and filename of the binary file.  You could turn this into an input to specify it at runtime as well.
   Open "C:\temp\objects.dat" For Binary Access Write As #1 ' Open it for binary writing with the handle #1

   CurrentRow = 1

   ' Keep reading the spreadsheet until we come to a blank row, then we're done
   Do While Not IsEmpty(Worksheets(1).Cells(CurrentRow, 1))
      'Level of object
      TempByte = Worksheets(1).Cells(CurrentRow, 1) ' Get the value from the first cell in the current row
      Put 1, , TempByte ' Write that byte to the data file (handle #1)

      'ID of object
      TempByte = Worksheets(1).Cells(CurrentRow, 2) ' Get the value from the second cell in the current row
      Put 1, , TempByte ' Write that byte to the data file (handle #1)

      'X Coordinate of object - this is a 2 byte value since it can be greater than 255, we need to swap endian
      TempInt = Worksheets(1).Cells(CurrentRow, 3) ' Get the value from the third cell in the current row
      TempByte = TempInt \ 256 ' Integer divide by 256, aka shift right 8 bits and put that into TempByte
      Put 1, , TempByte ' Write that byte to the data file (handle #1)
      TempByte = TempInt AND 255 ' Mask the data to grab the first byte and put that into TempByte
      Put 1, , TempByte ' Write that byte to the data file (handle #1)

      'Y Coordinate of object - this is a 2 byte value since it can be greater than 255, we need to swap endian
      TempInt = Worksheets(1).Cells(CurrentRow, 4) ' Get the value from the fourth cell in the current row
      TempByte = TempInt \ 256 ' Integer divide by 256, aka shift right 8 bits and put that into TempByte
      Put 1, , TempByte ' Write that byte to the data file (handle #1)
      TempByte = TempInt AND 255 ' Mask the data to grab the first byte and put that into TempByte
      Put 1, , TempByte ' Write that byte to the data file (handle #1)

      CurrentRow = CurrentRow + 1 ' Move to the next row in the spreadsheet
   Loop

   Close 1 ' Close the file (handle #1)

End Sub
And we’re done! A very simple program, with only a tiny bit of magic to flip the bytes when we need to make little endian into big endian. But a simple program which saves us hours of tedious hex encoding, plus the power of Excel gives us data storage and manipulation that we didn’t have to take time to manually program ourselves.
Next time you’re faced with a problem that deals with working with a lot of data, keep Excel (or it’s open source brethren) in mind – it can definitely save you a lot of time and headaches.