As any of my friends could tell you, I’m pretty big into collecting vintage computers. It costs me $70/month in storage fees, but I am just completely drawn to some of the awesome technical creativity that went into early machines before standardization took hold of the market. Mixed with the nostalgia, closeness to the hardware, and challenge of using something less than user-friendly, these old machines are great. In particular, I’m a big fan of the early portables, or luggables to be more realistic.
One fantastic machine that I’m lucky to have 3 of is the Osborne 1.
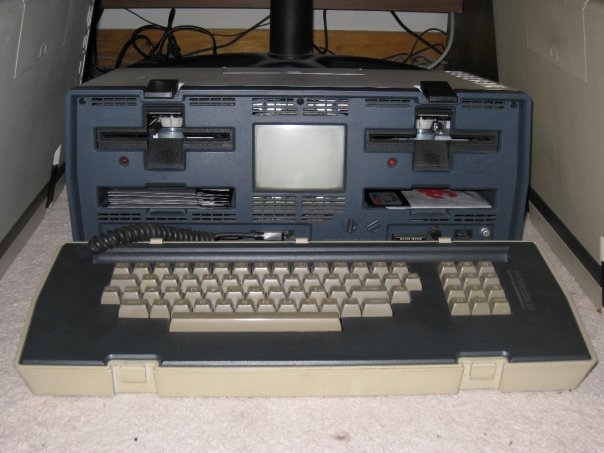
It’s a pretty sweet machine, running a Z-80 processor, 64K RAM, dual 5 1/4 floppies, a monochrome 5″ screen (love this, its absolutely tiny compared to the machine), modem port, serial port, battery port, parallel port, all folding into a suitcase.
If you’re lucky enough to get the original software pack, it actually comes with the a good amount of applications, including it’s OS CP/M (the precursor to DOS), Wordstar, Supercalc, CBASIC, MBASIC, and dBase II. However, I personally love vintage machines for their games and getting them connected to other computers. The machine sports a DB-25 serial port at 1200 bps, and I knew I could transfer the modest sized library of CP/M software that can still be found on the net over the serial link. I had no terminal software though, so I did some research and came up with the following after a long struggle (please leave a comment if you have any better info or corrections):
Transferring Files to the Osborne 1
- Use the DB-25 port – The machine has two serial interfaces, a DB-9 and a DB-25. There is not a lot of documentation out there regarding the difference, but from what I’ve gathered, the DB-9 is not a standard RS-232 serial port, but a TTL serial port specifically designed for use with the Osborne modem (that fit snuggling in the storage bay under the left disk drive). While I’m sure it’s possible to build or use a UART to convert TTL to RS-232, it’s easier to use the DB-25, which is indeed an RS-232 port.
- Do not use a null modem – One of the first things I kept running into was once I managed to find a way to transmit data (see below), my remote computer (my primary Debian box) got absolutely nothing over the line. Not garbled characters from a mismatch in speed, just absolutely nothing. I thought maybe my port was bad, so I tried a new Osborne hooked to another machine (even with a new cable), and still nothing. Of course, normally you would use a null modem to switch the send/receive pins when connecting a computer to another computer over serial link, which I was doing. It turns out that the Osborne serial port was probably designed to be used as a terminal, and hence it already does the crossover. I had to directly connect my serial cable from one computer to another, with no null modem, for it to work.
- Set the serial speed – Depending on what revision of the Osborne 1 you have, it will either have a default speed of 300 or 1200 bps. 1200 is slow enough, so you definitely want to make sure it isn’t set at 300 bps. The CP/M disk will contain a “setup.com” program that you can run to configure various settings, including serial speed. Make sure 1200 is selected.
- Use PIP to initially transfer files – PIP is a fantastic utility included with CP/M that allows data to be moved from one device to another – devices being both files or physical interfaces. With PIP, we can instruct the Osborne to dump a text file from a remote computer to a local file. While PIP has no error correction and is not designed to be a full terminal, it does get the job of initially getting a terminal program onto the machine. Usage consists of “PIP <target>=<source>”. So you could use it to copy a file from drive B to drive A, “PIP A:FILE.TXT=B:FILE.TXT”, or from the serial port to a file, “PIP B:FILE.TXT=RDR:”. RDR (short for reader, as in paper tape reader, oh the historical goodness in that one) is the device name for the serial port.
- Get the Kermit assembly modules (in hex) onto the machine – This part I gathered from instructions on z80.eu and using files from Columbia University’s Kermit Page. Columbia University has a huge archive of versions of Kermit for different computers, including CP/M machines. These consist of two files – the base Kermit module, and then a small module that is specific to the machine. In particular, cpsker.hex (the main kermit module), and cpvosb.hex (the Osborne 1 specific code). These previous links are copies I made of these files in case you can’t reach Columbia’s site for whatever reason. Start by instructing PIP to save data from the serial port to a file, e.g. “PIP B:CPVOSB.HEX=RDR:”, then dump the contents of this file on the remote computer to the serial port. After the transfer, you will have a good copy of cpvosb.hex on your Osborne (you may have to control-d, control-c, or control-z to end the transfer if the Osborne does not quit out automatically, sometimes it worked for me and sometimes it didn’t). The larger, main kermit module is a little more tricky.
- Get the main Kermit assembly module – Unfortunately, the main module is a little more tricky as its bigger than PIP’s buffer, so it must write a portion of the file to disk during transfer (as opposed to the entire thing at the end). The problem is, PIP has no error correction, and when it goes to use the disk drive, you WILL lose part of the file being transferred. The transfer takes a while anyway, so having to restart because of corruption is a giant pain. Since these hex files are simply text files, I split the file into 4 parts to decrease the chance of file corruption (and decrease the time I’d have to wait for each one if I had to retransmit). After splitting them into 4 parts, I followed the same procedure as in step 5 for each file. Once they were all on the machine, I cleaned up any extra line feeds introduced by the transfer with ED (ed is so non-intuitive it makes vi look like MS Word – reference for its use can be found here), then concatenated the files together with PIP (PIP full.txt=file1.txt,file2.txt,file3.txt,file4.txt). I then had both the kermit and machine module.
- Compile Kermit – Luckily, CP/M comes with both ASM and DDT on disk that allow compiling and linking source files. We will use DDT to link these two modules together. The following blurb is from the Columbia page with a few comments from me:
          ddt cpsker.hex <--- At the command line, DDT your base module

          NEXT  PC
          3500 0100
          -cpvosb.hex  <--- insert the machine dependent module
          -r
          NEXT  PC
          xxxx 0000
          -^C  <---- control-c

          A>save dd kerm411.com  <---- executable file to create

      "The page count ("dd") used in the SAVE command is calculated from
      the last address ("xxxx") given by DDT in response to the R command:
      drop the last two digits and add 1 if they were not zero, then
      convert from hexadecimal (base 16) to decimal (base 10): 684F
      becomes 69 hex, which is 105 decimal (5 times 16 plus 9) -- but 6700
      becomes 67 hex, or 103 decimal."
If you receive any errors or strange messages from DDT that don't match what's listed above, it's likely your files were corrupted during transfer (this happened twice to me) and you will need to try again. Also make sure that you have enough room on your floppy to create the executable, you might have to do some disk and file juggling!
- Assign Logical to Physical Device - This one you'll have to do every time you restart the machine before you use Kermit. CP/M machines have logical and physical devices. We've worked with the physical serial port device RDR, but there are logical devices that are connected to physical devices to perform translations. Kermit makes use of the PTR (paper tape reader) logical device, so we need to connect this logical device to the serial port physical device. We do this using the STAT command - "STAT PTR:=RDR:".
- You're Done! - At this point, you have Kermit, ready to use, on your Osborne 1. There are many implementations (as seen on the Columbia page) of Kermit for every OS, so finding one for Windows, OS X or Linux won't be an issue. There are lots of guides out there for using Kermit as well, so I won't mention the commands here - they're fairly straight forward. Kermit does have error correction and multi-file transferring capabilities, so you can let it go for 30 minutes and transfer something big with no worries. It can also be used as a terminal, so you can connect over serial link to a linux shell and have some fun!
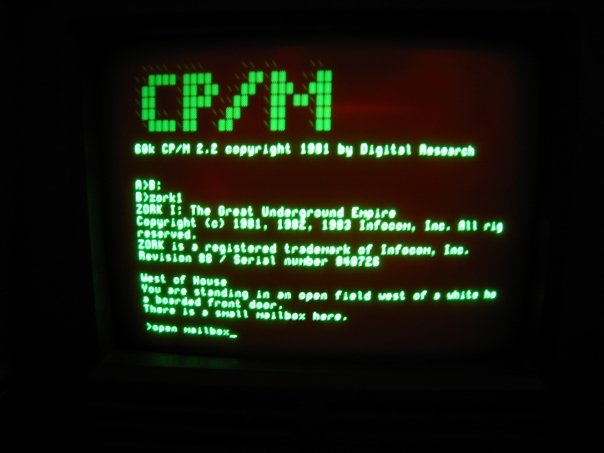
The first thing I transferred once Kermit was good to go was Zork-I, there is just something about text adventures on monochrome screens that is just awesome. Zork I, II, and III for CP/M can be found here. What's nice is these archives make use of a separate z-machine from the data file, so you can copy any z3 data file (which are the vast majorities, I used this method to play The Lurking Horror) in place of zork1.dat - just remember to rename it the same thing.
Have fun with your Osborne 1!