Category Archives: RetroComputing

My Newest Robotic Buddy, Vincent (CompuRobot)

It’s not uncommon if you love programming, computers, tinkering, and all things electronic, that you also have a love for robots. I am not unique in this regard! I’m a fan of programmable bots in general (I have a few of the Lego mindstorm robots, including the newer NXT). Recently, my friend Ryan gave me this little guy:

He bears the name “COMPUROBOT”, and as can be seen, shows a striking resemblance to Vincent from Disney’s The Black Hole. For this reason, that’s the name I’ve chosen for him.
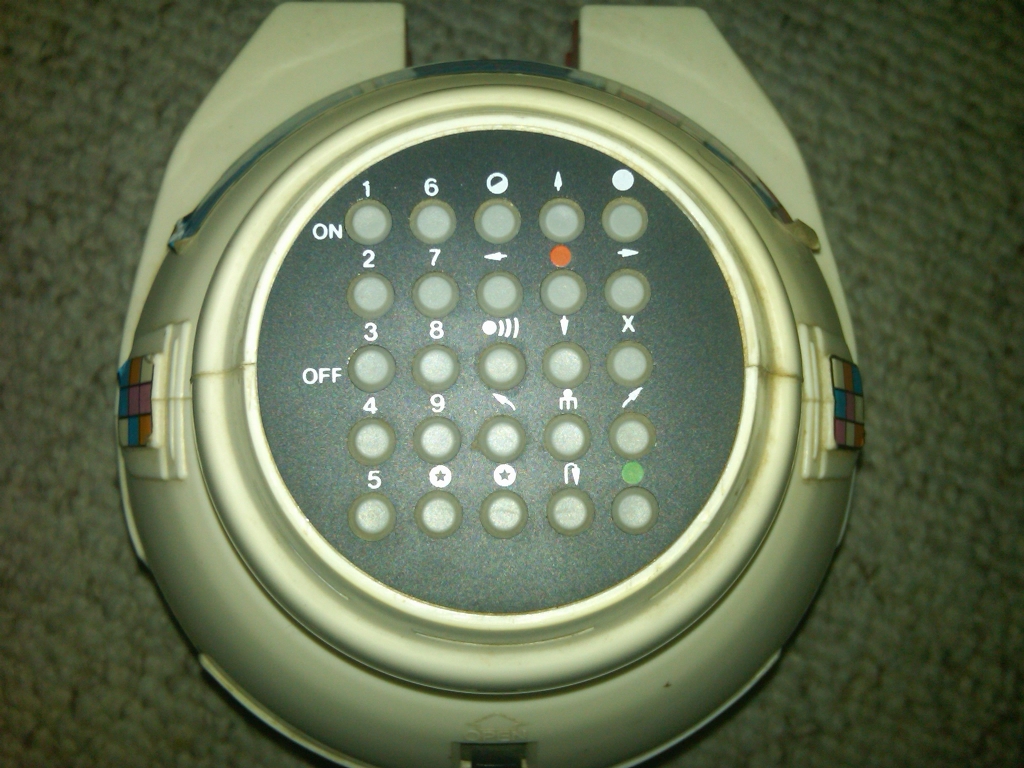
At first glance, Vincent looks like a simple toy – he has a fun shape, features LEDs for eyes, flashing bulb in his belly, colorful stickers, and a sturdy design. He is driven by two independent wheels below and supported in the front by two smaller wheels. However, there is quite a bit more at play than a simple toy that runs around the room. Examining the top of Vincent reveals a 5×5 Matrix of buttons, each with an icon indicating its function. It turns out Vincent, the Compurobot, is a programmable robot!

Though some of the icons seem to suggest movement, I wasn’t quite sure what all of them meant, or in what the protocol for using them was, so I luckily was able to find the manual online.

Capabilities

Vincent features a 4-bit processor and a small amount of RAM that can hold up to 48 commands. Though its volatile and erases after turning him off, the procedure is very simple for programming. Simply hit the button of the action (forward, backward, turn, play noise, etc), and then the number of seconds you wish him to perform it. E.g. hitting FORWARD, 4, LEFT, 3, BACK, 6 and then START (green) would cause him to go forward for 3 seconds, turn left for 3 seconds, then back for 6 seconds. Sound can be played simultaneously (you turn it on and off with 1 and 3, respectively), so Vincent can make cool noises while charging along. He even features a 3-gear module with a 9400 RPM motor, which can be programmed as well (icon with the circle and 3 connected lines).

Though the CPU appears to be very simple without the ability to perform conditional processing (which also leaves out the possibility of looping), a neat little feature it does have is the ability to multiply time amounts. The X button on the control panel is multiplication – so if you’d like Vincent to go forward 48 seconds, you can hit 6 X 8. Just a nice little added feature!

The Atari Connection

What could be most neat of all about this little guy? He was produced by Axlon – which you may not have heard of. But Axlon was a company created by Nolan Bushnell, founder of Atari. Axlon had produced a few such robots, but they never took off like his earlier company did.

All in all, a very cool present! Thanks Ryan!

Shredz64 at the Portland Retro Gaming Expo

Just a heads up, if you’re around the Portland, OR area this weekend (September 18-19), stop by the Portland Retro Gaming Expo. Not only does it promise to have TONS of retro games, hardware, and general awesomeness to play and buy, but the Commodore Computer Club and Users Group of Vancouver, WA will be at the Expo demonstrating Shredz64 and the PSX64 in action! They’ll also have lots of other Commodore goodness to check out.

The expo is located at:

Portland Crowne Plaza
1441 NE 2nd Avenue
Portland, OR
503-233-2401

And full details can be obtained on the website. Personally I’m very jealous of everyone who gets to attend, I wish I could be there myself – it looks like its going to be a blast! Check it out if you can!

10 Reasons the Commodore 64 Will Never Die

As some of you might have guessed by now, I’m pretty heavily into retro computers. I love them all in different ways, but the C64 holds a very special place in my heart in particular. It was my very first computer (and my only machine for 8 years) – and it introduced me into a world which I never escaped. I learned how to program on it, played my first computer game on it, and spent a great deal of my childhood on it. So while I might be biased as I write this, I’ll try to be as objective as possible.

1. The Game Library

The C64 has always been known as a gaming machine, and for good reason. While the computer has been used across all areas of computing, from music composition and graphic design to business management and financial accounting, its library of games is MASSIVE. Estimates come in at over 21,000 titles, and new titles are still being developed all the time (Check out the most comprehensive database at GB64). And like any media, from music to movies, just because the title is older doesn’t mean it’s not still enjoyable – there are some simply great games for the C64 that are still lots of fun to play.

2. Quantity Produced

The Commodore 64 is still the best selling computer to this day – and most likely will be forever. Saying it sold well would be a gross understatement – it crushed the home computer market. Jack Tramiel, founder of Commodore, did a lot of things right in his day, and one was the price point of the machine. While it started at $595, it eventually dropped to $200, and estimates of units sold range from 17 to 30 MILLION. Even with a large portion of owners throwing their machine away over time, 30 million computers simply don’t disappear. It is still extremely easy to pick up a C64 off of eBay, Craigslist, or other online sites.

3. The Community

While this is true of a lot of the classic computers, it is especially true of the Commodore line – there is still a huge following for this machine. It’s likely if you look enough online, you’ll still find a user’s group, yearly convention, or informal get-together that includes, or even focuses on, the C64. I’ve personally attended a couple conferences (TPUG‘s World of Commodore and ECCC), and have been in close contact with other groups (Commodore Computer Club and Users Group in Vancouver, WA) – and they’re all friendly guys and gals who have a common love for all things Commodore (and Amiga, and Apple, and Atari, etc…). They are the true heart that continues to drive the C64 onward!

4. The SID Chip

The MOS 6581/8580 SID is arguably one of the greatest sound chips to ever be produced. During its time, there was no other 8-bit computer that had the sound capabilities of the C64. Even in contemporary times, the unique sound quality of the SID is still a desired effect that modern musicians seek to take advantage of. Newer dedicated hardware, such as the SIDStation, has been used by groups such as Timbaland and Machinae Supremacy to produce the sweet C64-style synth sounds that can’t be gotten anywhere else.

5. Hackability

While computers today can render 3D worlds while playing a 20 part symphony and downloading a set of encyclopedias, this comes at a cost – and that cost is complexity. The beauty of a machine like the C64 is a hardware or software developer’s ability to interact directly with the machine. You can read and write directly from/to memory, tie into the system bus, and do a whole other array of low level things that 62 layers of hardware and operating system don’t allow you to do on a new PC. For those who love to tinker, this is a dream.

6. New Capabilities

Due in large part to #2 and #5, new hardware still being made constantly, which breathes incredible new life into the machine. From SD/CF card readers and Ethernet adapters, to mp3 players and accelerators, the Commodore 64 of today is a different beast than in its 80s heyday. When a machine with a 1 MHz processor and 64K of RAM can surf the web, tweet on Twitter, and can access files on an 160GB IDE hard drive, that’s truly amazing.

7. Strong Emulator Support

Using a Commodore 64 doesn’t necessarily mean you need the hardware anymore. Since the advent of faster machines with emulation capabilities, many developers have been working on virtual versions of the hardware counterpart. Many years have passed, and these are now solid, amazing, and free applications that allow you to use a C64 on a variety of devices, from computers and laptops to PSPs and iPhones. Even if all the hardware one day disappeared, emulators never will. Two of the most popular ones are VICE and CCS64).

8. FPGA Implementations

In the same vein as #7, some hardware wizards have gone the emulation route, but instead of producing a software version, have reimplemented the machine in FPGA hardware. In this manner, the C64 exists as firmware on a programmable chip, which allows for smaller, cheaper, and easily upgradable/hackable versions of the C64. And since the machine exists as firmware, many of these devices have different models of computers on the same device – flip the switch and go from using a C64 to an Amiga 500. Examples include Jeri Ellsworth’s DTV and the MCC (Multiple Classic Computer).

9. The Scene

Since the beginning, due to its powerful sound and graphics capability, the C64 has been used to demonstrate elite programming skills through dazzling shows of animation and music. While it started in large part as intros to software cracks, the demo scene grew into a beast all of itself. Some of the greatest artistic, musical, and programming talent to ever hit a computer has gone into software demos. And to this day, programming gurus continue to show off their talents on the C64 – not only because it’s a great platform to program for, but feats are all the more impressive when accomplished in minimal space/computation. A list of upcoming Demo parties can be found at Demo Party.net

10. The Shameless Plug

And the C64 is the only place to find Shredz64 (Guitar Hero for the C64)! ๐Ÿ˜‰ It’s just fun to show your friends that a machine made in 1982 can do the same things that a new PS3 or Wii can do. (Sorry, had to do it)

So if you’ve never tried a C64, or haven’t touched one for a long time – find an emulator, pick one up off eBay, or borrow a friend’s – and find out for yourself why it’s still the most amazing computer ever made!

Network Any Vintage Computer! (Kind Of)

The idea of computers communicating with each other has fascinated me from the very beginning. When I was little, the world of networking was a “mysterious” one, as I didn’t own a modem until I was 12 and had only experienced the idea of computers talking to each other from TV and movies (read: War Games). When I finally did get my first 2400bps, I got huge into BBSes and ran my own (Pig Pen Forever!), learned everything I could about serial communication and modems. Then when I was older and had access to equipment, I got into Ethernet, TCP/IP, and the wonderful world of modern day networking. But it always goes back to that magic of seeing something pop-up on your screen that didn’t originate from the local machine – it came from somewhere else, either another computer in the room, or half way across the world.

PortServer - ExampleBecause of this, a favorite activity of mine is connecting my vintage machines up in one way or another so they can share data and download programs from the rest of my network. These connections range from a sophisticated TCP/IP stack over Ethernet on my Amiga 4000, to a simpler TCP/IP over PPP over serial on my Apple IIGS, to a very simple Kermit over serial on my Osborne-1.

The Problem With This

With the exception of the Amiga which actually makes use of Ethernet, there are a few issues with this setup – all of which originate from these links being RS-232 serial.

  1. RS-232 is physically point to point, each end needs a dedicated serial port for that connection.
  2. RS-232 is also logically point to point, a device can only directly communicate with the device on the other end of the serial link.
  3. Assuming the computers are DTE devices, a crossover adapter (null modem) needs to be used on the serial connection to flip the send/receive pins.
  4. Serial cables tend to be bulky and expensive, especially when you add in gender changers and null modems. Add a few of them and you have cables everywhere.

A Neat Solution

While the best way to tackle this situation is obtain a native Ethernet network card/adapter for the machine in question, this can be difficult, expensive, or impossible in many cases since for many of the lesser known vintage machines, network cards were simply never made, and there isn’t enough of a community to build one. Luckily though, most vintage machines tend to have serial port – wouldn’t it be great if we could convert that serial port into an Ethernet port? Or even better, include a range of network oriented services integrated into that network port?

Enter the Digi PortServer

PortServer - PhotoFor the record, I’ll say that I have no affiliation with Digi, I just think they have a really cool product and wanted to share it. Digi produces a line of hardware devices known as the “PortServer” which basically converts a serial port into a network port. What’s better, it can combine multiple serial ports onto a single network connection, so 8 machines can be plugged in over a serial link, which connect to the network via the PortServer only using a single network cable. More importantly, the PortServer supports the following to make networking vintage machines a reality:

  1. Virtual COM/TTY ports – Digi provides drivers that create a virtual COM port on your Windows box (or TTY on your Linux box) which transparently connects over a network to a PortServer serial port. So you can be two countries away, but as far as Windows, your software, and the software sitting on your vintage machine is concerned, you are connected over a hard serial link. This is great for applications made for serial communication that need a com port.
  2. Outgoing TCP connections – The PortServer can be set to automatically connect to an IP and port when serial traffic originates on the vintage computer – e.g. when I open my terminal up on my Apple IIGS, the port server will automatically connect the serial port to a telnet session on my Linux box, or on my favorite BBS.
  3. Incoming TCP connections – The PortServer can listen for connections made on a specific port, and then connect that traffic to the vintage computer – e.g. I can telnet to port 2002 on my PortServer from my Linux box, and it will connect me to the serial port of my Osborne 1. Now you can access your vintage machine from at work!
  4. Modem Emulation – The Port Server can emulate a Hayes compatible modem, while passing traffic via TCP – which means you can run your favorite old BBS like new over telnet without fear of strange compatibility issues or rewriting any code.
  5. PPP – The PortServer supports the PPP protocol, which means if you have a machine capable of speaking PPP (such as an Apple IIGS running Marinetti), your PortServer can take care of handling the PPP traffic. There are configuration options for IP address assignment and negotiation attributes in the PortServer setup.
  6. Chat Mode – The PortServer can also combine multiple sessions together at once, so more than one computer can be connected to your vintage machine at the same time. This can be a good way to monitor traffic or create a shared environment for 2+ person communication.
  7. Lots more – The PortServer also has options for serial printers, industrial applications, power over serial, remote waking, wireless, users and security – the list goes on and on.

I had known that serial IP extenders existed, but when I finally picked up one of the Digi boxes, I was truly amazed by how many options the firmware provides – it’s really impressive.

PortServer - Wireless
A 4 port wireless Digi PortServer

It’s Not All Roses

There are a few issues though:

  1. Latency – since the data is being converted from a hardwired RS-232 to packet based back to RS-232, there is definitely an increase in latency, and issues with the network can mean lost or slow data, which isn’t a problem for a direct, hardwired link.
  2. RJ-45 Ports – The PortServers don’t have DB-9 ports, rather RJ-45 ports akin to Cisco or other networking equipment console ports. They understandably do this so any range of converter cables can be used with a wide variety of ends, but in most cases you’ll just want a DB-9. I ordered a two port PortServer and it came with a single RJ-45->DB-9 cable, so I’ll need to get/build another if I want to use the other serial port on the box simultaneously.
  3. Price – They can get a bit expensive. A two porter can go anywhere from $250-$340 depending on the options it’s equipped with. Also available are 4 port, 8 port, and 16 serial port models, the latter which gets close to $1200. However, depending on how many machines you actively would like “networked”, 2-4 would probably suit most peoples’ needs – I know I’ll be fine with 2.

The Sky’s the Limit

I’ve only had mine hooked up for the last few hours, and already I’m thinking about a dozen uses for this thing. And while it isn’t a miracle product for anything modern that features a network jack – it is an amazing buddy for vintage computers in need of network communication.

Well, I’m off to surf some BBSes on my Osborne-1!

Digi Official Website

Great Retro Computing Podcast

As is painfully apparent by my projects/blog posts/hobbies, I’m a huge retro computing fan. As such, I find it interesting to hear about others’ experiences with retro hardware – what they have in their collection, forgotten tidbits about these computers, things currently going on in the community, etc.

A fantastic podcast I’ve been listening to for a couple months now and really digging is The Retrobits Podcast.

There have been 116 shows or so, all covering a variety of different machines and topics. If you’re a classic computer fan like me, you should check it out – the host, Earl Evans, seems like a nice guy and does a good job with presenting the info in a clear and entertaining manner. Plus he’s a Commodore fan so bonus points there.

So load up your iPod or Smart Phone and give it a listen on your way into work, it definitely makes my morning commute more enjoyable.

Setting Up an IRIX Cluster

In my quest to collect a massive number of vintage and non-x86 machines, I recently picked up two Silicon Graphics workstations. I was pretty excited about this – as a teenager I had always been in awe of SGI and the amazing 3D their machines pumped out. As the originators of OpenGL and creators of some of today’s fastest supercomputers, SGI is one impressive organization.

The Operating System

One of the cool things about SGI stations besides their fast as hell (at the time) MIPS RISC processors is their operating system, IRIX. IRIX is a UNIX designed for the MIPS line and an X custom tailored to the SGI graphics chipset.

SGI Screenshot
Photo of IRIX screen running a demo, GIMP, and a terminal

Another great feature of IRIX is built in clustering using array services. Like all clustering, this allows you share the processing power and memory of multiple IRIX workstations to accomplish tasks more quickly. Being an older OS, I was nervous the process would be difficult, but it wasn’t bad at all.

The following is what I did to create my “Excelsis” cluster, consisting of my two SGI workstations, Metatron and Gabriel:

  1. Install Array Services – array services can be found on the operating system disks that come with your workstation.
  2. Configure Your Array – IRIX comes with an arrayconfig script to generate the array configuration file, but chances are you’ll need to tweak it anyway, I find it easier to simply create the file in its entirety. The configuration file can be found at “/usr/lib/array/arrayd.conf”.

    Each array this machine participates in must be defined in this file. The first is normally an array labeled “me” which consists only of the localhost. Any further arrays require a name, plus a list of all machines in the array, which each need their own label and IP address or address to contact them at.

    array me
         machine localhost
    
    array excelsis
         machine metatron
              hostname "192.168.0.15"
         machine gabriel
              hostname "192.168.0.16"
    

    According to the documentation, quotations are necessary for hostname. As can be seen, I have defined an array called “excelsis”, with two machines, one named “metatron” and one named “gabriel”. I then specified the IP address of each machine.

    The default arrayd.conf file will define a number of array commands that can be run from the terminal. These are all well known UNIX commands such as top, ps, and who, only they can be run on the array as a whole, as opposed to just the local machine. E.g., running “array who” would list all users logged into the array (i.e. any machine connected to the array). Leave these commands where they are and jump to the end of the config file.

    The end of the configuration file contains a “local” identifier that contains settings and defaults for array services running on the machine, such as the port array services listens on and the default array for array commands (remember, your machine can participate in more than 1 array. If you run an array command without specifying an array, it will default to the one specified here). You’ll want to change “destination array” to be the name of your default array. In my case, I changed it to “excelsis”. That’s it for this file!

  3. Configure Array Security – By default, your array will be configured to not allow connections from remote machines. This allows messages to be passed via MPI between programs running on your machine, but doesn’t allow for clustering. Edit the “/usr/lib/array/arrayd.auth” file, and you should see “AUTHENTICATION NOREMOTE”. You’ll want to change this to “AUTHENTICATION NONE” if you want any machine to be able to connect to your array (not secure, but may not be an issue if you’re running behind a firewall), or “AUTHENTICATION SIMPLE” if you’d like to setup private keys for each machine. If you go the simple authentication route, you’ll need to specify “HOSTNAME machine1.domain.com KEY 0x3817382771948” where machine1.domain.com is the address of the machine, and the hex string following KEY is the private key. You’ll need to specify this for all machines. These keys must match per machine on all machines in the array.
  4. Autostart Array Services – Now that you have your array services configured, you can tell IRIX to start it on bootup by enabling it in chkconfig. If you aren’t familiar with chkconfig, it is a special utility that configures whether various daemons should autostart at bootup or not. You can see a list of which daemons are currently set to start by running “chkconfig” with no arguments. To autostart array services, type “chkconfig array on”.
  5. Rinse, Repeat – You’ll need perform the above steps on every machine participating in the array. Assuming you have NFS starting before your array, I don’t see any reason why these configurations couldn’t be symbolically linked to one central configuration, but if you ever wanted machine specific settings you’d be out of luck. I simply edited the files on both my SGI workstations.

At this point, you can run an “array who” to see all people logged into your array and “array ps” to see all processes running on all your clustered machines. The fun really begins for programmers at this point, as you can make use of the MPI libraries to share tasks across multiple nodes in your cluster for parallel processing.

While IRIX is on its way out and the chances of needing to setup a cluster is slim, it can be a fun little project if you have a few SGIs kicking around. It would also be interesting to see the compatibility of passing MPI messages between IRIX and non-IRIX clusters. A project for another day!

Transferring files to the Osborne 1

As any of my friends could tell you, I’m pretty big into collecting vintage computers. It costs me $70/month in storage fees, but I am just completely drawn to some of the awesome technical creativity that went into early machines before standardization took hold of the market. Mixed with the nostalgia, closeness to the hardware, and challenge of using something less than user-friendly, these old machines are great. In particular, I’m a big fan of the early portables, or luggables to be more realistic.

One fantastic machine that I’m lucky to have 3 of is the Osborne 1.

Osborne 1

It’s a pretty sweet machine, running a Z-80 processor, 64K RAM, dual 5 1/4 floppies, a monochrome 5″ screen (love this, its absolutely tiny compared to the machine), modem port, serial port, battery port, parallel port, all folding into a suitcase.

If you’re lucky enough to get the original software pack, it actually comes with the a good amount of applications, including it’s OS CP/M (the precursor to DOS), Wordstar, Supercalc, CBASIC, MBASIC, and dBase II. However, I personally love vintage machines for their games and getting them connected to other computers. The machine sports a DB-25 serial port at 1200 bps, and I knew I could transfer the modest sized library of CP/M software that can still be found on the net over the serial link. I had no terminal software though, so I did some research and came up with the following after a long struggle (please leave a comment if you have any better info or corrections):

Transferring Files to the Osborne 1

  1. Use the DB-25 port – The machine has two serial interfaces, a DB-9 and a DB-25. There is not a lot of documentation out there regarding the difference, but from what I’ve gathered, the DB-9 is not a standard RS-232 serial port, but a TTL serial port specifically designed for use with the Osborne modem (that fit snuggling in the storage bay under the left disk drive). While I’m sure it’s possible to build or use a UART to convert TTL to RS-232, it’s easier to use the DB-25, which is indeed an RS-232 port.
  2. Do not use a null modem – One of the first things I kept running into was once I managed to find a way to transmit data (see below), my remote computer (my primary Debian box) got absolutely nothing over the line. Not garbled characters from a mismatch in speed, just absolutely nothing. I thought maybe my port was bad, so I tried a new Osborne hooked to another machine (even with a new cable), and still nothing. Of course, normally you would use a null modem to switch the send/receive pins when connecting a computer to another computer over serial link, which I was doing. It turns out that the Osborne serial port was probably designed to be used as a terminal, and hence it already does the crossover. I had to directly connect my serial cable from one computer to another, with no null modem, for it to work.
  3. Set the serial speed – Depending on what revision of the Osborne 1 you have, it will either have a default speed of 300 or 1200 bps. 1200 is slow enough, so you definitely want to make sure it isn’t set at 300 bps. The CP/M disk will contain a “setup.com” program that you can run to configure various settings, including serial speed. Make sure 1200 is selected.
  4. Use PIP to initially transfer files – PIP is a fantastic utility included with CP/M that allows data to be moved from one device to another – devices being both files or physical interfaces. With PIP, we can instruct the Osborne to dump a text file from a remote computer to a local file. While PIP has no error correction and is not designed to be a full terminal, it does get the job of initially getting a terminal program onto the machine. Usage consists of “PIP <target>=<source>”. So you could use it to copy a file from drive B to drive A, “PIP A:FILE.TXT=B:FILE.TXT”, or from the serial port to a file, “PIP B:FILE.TXT=RDR:”. RDR (short for reader, as in paper tape reader, oh the historical goodness in that one) is the device name for the serial port.
  5. Get the Kermit assembly modules (in hex) onto the machine – This part I gathered from instructions on z80.eu and using files from Columbia University’s Kermit Page. Columbia University has a huge archive of versions of Kermit for different computers, including CP/M machines. These consist of two files – the base Kermit module, and then a small module that is specific to the machine. In particular, cpsker.hex (the main kermit module), and cpvosb.hex (the Osborne 1 specific code). These previous links are copies I made of these files in case you can’t reach Columbia’s site for whatever reason. Start by instructing PIP to save data from the serial port to a file, e.g. “PIP B:CPVOSB.HEX=RDR:”, then dump the contents of this file on the remote computer to the serial port. After the transfer, you will have a good copy of cpvosb.hex on your Osborne (you may have to control-d, control-c, or control-z to end the transfer if the Osborne does not quit out automatically, sometimes it worked for me and sometimes it didn’t). The larger, main kermit module is a little more tricky.
  6. Get the main Kermit assembly module – Unfortunately, the main module is a little more tricky as its bigger than PIP’s buffer, so it must write a portion of the file to disk during transfer (as opposed to the entire thing at the end). The problem is, PIP has no error correction, and when it goes to use the disk drive, you WILL lose part of the file being transferred. The transfer takes a while anyway, so having to restart because of corruption is a giant pain. Since these hex files are simply text files, I split the file into 4 parts to decrease the chance of file corruption (and decrease the time I’d have to wait for each one if I had to retransmit). After splitting them into 4 parts, I followed the same procedure as in step 5 for each file. Once they were all on the machine, I cleaned up any extra line feeds introduced by the transfer with ED (ed is so non-intuitive it makes vi look like MS Word – reference for its use can be found here), then concatenated the files together with PIP (PIP full.txt=file1.txt,file2.txt,file3.txt,file4.txt). I then had both the kermit and machine module.
  7. Compile Kermit – Luckily, CP/M comes with both ASM and DDT on disk that allow compiling and linking source files. We will use DDT to link these two modules together. The following blurb is from the Columbia page with a few comments from me:
    
    
              ddt cpsker.hex <--- At the command line, DDT your base module
    
              NEXT  PC   
              3500 0100
              -cpvosb.hex  <--- insert the machine dependent module
              -r
              NEXT  PC
              xxxx 0000
              -^C  <---- control-c
    
              A>save dd kerm411.com  <---- executable file to create
    
          "The page count ("dd") used in the SAVE command is calculated from
          the last address ("xxxx") given by DDT in response to the R command:
          drop the last two digits and add 1 if they were not zero, then
          convert from hexadecimal (base 16) to decimal (base 10): 684F
          becomes 69 hex, which is 105 decimal (5 times 16 plus 9) -- but 6700
          becomes 67 hex, or 103 decimal."


    If you receive any errors or strange messages from DDT that don't match what's listed above, it's likely your files were corrupted during transfer (this happened twice to me) and you will need to try again. Also make sure that you have enough room on your floppy to create the executable, you might have to do some disk and file juggling!

  8. Assign Logical to Physical Device - This one you'll have to do every time you restart the machine before you use Kermit. CP/M machines have logical and physical devices. We've worked with the physical serial port device RDR, but there are logical devices that are connected to physical devices to perform translations. Kermit makes use of the PTR (paper tape reader) logical device, so we need to connect this logical device to the serial port physical device. We do this using the STAT command - "STAT PTR:=RDR:".
  9. You're Done! - At this point, you have Kermit, ready to use, on your Osborne 1. There are many implementations (as seen on the Columbia page) of Kermit for every OS, so finding one for Windows, OS X or Linux won't be an issue. There are lots of guides out there for using Kermit as well, so I won't mention the commands here - they're fairly straight forward. Kermit does have error correction and multi-file transferring capabilities, so you can let it go for 30 minutes and transfer something big with no worries. It can also be used as a terminal, so you can connect over serial link to a linux shell and have some fun!
  10. The first thing I transferred once Kermit was good to go was Zork-I, there is just something about text adventures on monochrome screens that is just awesome. Zork I, II, and III for CP/M can be found here. What's nice is these archives make use of a separate z-machine from the data file, so you can copy any z3 data file (which are the vast majorities, I used this method to play The Lurking Horror) in place of zork1.dat - just remember to rename it the same thing.

    Have fun with your Osborne 1!

    Zork 1 on Osborne 1