Monthly Archives: October 2008

Shredz64 – Difficulty Selection and Upcoming Live Demo

Thanks to a few nice, quiet hours I had tonight, I was able to do some Shredz64 development. One thing I quickly noticed at the ECCC convention last month was that Shredz64 is too hard for new players. The timing is different from Guitar Hero, and is pretty demanding on top of that, so unless you’ve been playing for a while, it’s pretty hard. This was where it was nice to see other people using it, as its hard to judge the difficulty of something you’ve been playing for a year.

So to combat this issue, I’ve added the choice to play a track in either “Easy” or “Hard” mode when selecting the song by pressing green or red, respectively.

Shredz64 - Difficulty

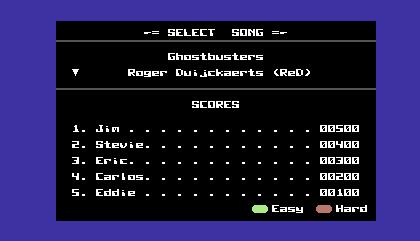
Selecting hard plays the track at the same difficulty as before, but selecting easy plays the track much more leniently – the notes are the same, but the note matching gives you an additional 10 pixels above and below what is considered a valid note hit in hard mode. This will hopefully make the game a little more approachable for new players coming from playing Guitar Hero.

Live Demo – TPUG’s World of Commodore Expo

Also – just a quick announcement, I will be demoing Shredz64 and the PSX64 interface, as well as selling a few PSX64s at the upcoming World of Commodore Expo hosted by TPUG in Toronto on December 6th. Even if you’re not interested in Shredz64, I urge you to check out WoC, they have quite a few demos, lots of tables with great Commodore stuff for sale, and knowledgeable and friendly people to talk to. Toronto is always a fun place to visit as well, so make a weekend of it! Hope to see you there!

Setting Up an IRIX Cluster

In my quest to collect a massive number of vintage and non-x86 machines, I recently picked up two Silicon Graphics workstations. I was pretty excited about this – as a teenager I had always been in awe of SGI and the amazing 3D their machines pumped out. As the originators of OpenGL and creators of some of today’s fastest supercomputers, SGI is one impressive organization.

The Operating System

One of the cool things about SGI stations besides their fast as hell (at the time) MIPS RISC processors is their operating system, IRIX. IRIX is a UNIX designed for the MIPS line and an X custom tailored to the SGI graphics chipset.

SGI Screenshot
Photo of IRIX screen running a demo, GIMP, and a terminal

Another great feature of IRIX is built in clustering using array services. Like all clustering, this allows you share the processing power and memory of multiple IRIX workstations to accomplish tasks more quickly. Being an older OS, I was nervous the process would be difficult, but it wasn’t bad at all.

The following is what I did to create my “Excelsis” cluster, consisting of my two SGI workstations, Metatron and Gabriel:

  1. Install Array Services – array services can be found on the operating system disks that come with your workstation.
  2. Configure Your Array – IRIX comes with an arrayconfig script to generate the array configuration file, but chances are you’ll need to tweak it anyway, I find it easier to simply create the file in its entirety. The configuration file can be found at “/usr/lib/array/arrayd.conf”.

    Each array this machine participates in must be defined in this file. The first is normally an array labeled “me” which consists only of the localhost. Any further arrays require a name, plus a list of all machines in the array, which each need their own label and IP address or address to contact them at.

    array me
         machine localhost
    
    array excelsis
         machine metatron
              hostname "192.168.0.15"
         machine gabriel
              hostname "192.168.0.16"
    

    According to the documentation, quotations are necessary for hostname. As can be seen, I have defined an array called “excelsis”, with two machines, one named “metatron” and one named “gabriel”. I then specified the IP address of each machine.

    The default arrayd.conf file will define a number of array commands that can be run from the terminal. These are all well known UNIX commands such as top, ps, and who, only they can be run on the array as a whole, as opposed to just the local machine. E.g., running “array who” would list all users logged into the array (i.e. any machine connected to the array). Leave these commands where they are and jump to the end of the config file.

    The end of the configuration file contains a “local” identifier that contains settings and defaults for array services running on the machine, such as the port array services listens on and the default array for array commands (remember, your machine can participate in more than 1 array. If you run an array command without specifying an array, it will default to the one specified here). You’ll want to change “destination array” to be the name of your default array. In my case, I changed it to “excelsis”. That’s it for this file!

  3. Configure Array Security – By default, your array will be configured to not allow connections from remote machines. This allows messages to be passed via MPI between programs running on your machine, but doesn’t allow for clustering. Edit the “/usr/lib/array/arrayd.auth” file, and you should see “AUTHENTICATION NOREMOTE”. You’ll want to change this to “AUTHENTICATION NONE” if you want any machine to be able to connect to your array (not secure, but may not be an issue if you’re running behind a firewall), or “AUTHENTICATION SIMPLE” if you’d like to setup private keys for each machine. If you go the simple authentication route, you’ll need to specify “HOSTNAME machine1.domain.com KEY 0x3817382771948” where machine1.domain.com is the address of the machine, and the hex string following KEY is the private key. You’ll need to specify this for all machines. These keys must match per machine on all machines in the array.
  4. Autostart Array Services – Now that you have your array services configured, you can tell IRIX to start it on bootup by enabling it in chkconfig. If you aren’t familiar with chkconfig, it is a special utility that configures whether various daemons should autostart at bootup or not. You can see a list of which daemons are currently set to start by running “chkconfig” with no arguments. To autostart array services, type “chkconfig array on”.
  5. Rinse, Repeat – You’ll need perform the above steps on every machine participating in the array. Assuming you have NFS starting before your array, I don’t see any reason why these configurations couldn’t be symbolically linked to one central configuration, but if you ever wanted machine specific settings you’d be out of luck. I simply edited the files on both my SGI workstations.

At this point, you can run an “array who” to see all people logged into your array and “array ps” to see all processes running on all your clustered machines. The fun really begins for programmers at this point, as you can make use of the MPI libraries to share tasks across multiple nodes in your cluster for parallel processing.

While IRIX is on its way out and the chances of needing to setup a cluster is slim, it can be a fun little project if you have a few SGIs kicking around. It would also be interesting to see the compatibility of passing MPI messages between IRIX and non-IRIX clusters. A project for another day!

Telltale Games – A Top Notch Gaming Company

I’m a pretty big fan of games in general. I love playing them, making them, watching the impact they make – everything about the industry is pretty awesome. While I was certainly a Nintendo kid, gaming really started for me on the Commodore 64, and enjoyment grew into a true appreciation with adventure games and my first PC, as I talk about here.

Where Did the Adventure Go?

The gaming market has changed in some very distinct ways over the years for a number of reasons. One of these changes that has been talked about quite a bit is the decline of the adventure game market. These games used to dominate, and now are the stuff of homebrew projects and small corners in software stores. While it’s sometimes difficult to discern if the market shapes corporate decisions or vice versa, we are indeed in a place where giants like Activision abandon clearly sought titles (read: Ghostbusters) as the profit margins are deemed unworthy by their market research and finance personnel. A business must survive and prosper to continue to push out product, but there is that point where an organization becomes more concerned about their profit than their product. And we are in no shortage of companies that subscribe to these views.

The Gallant Few

On the other side, there are those gaming companies that understand they can make a profit but still have a soul – staying true to the heart of the gaming community. I speak of Telltale Games, makers of the Sam and Max series, Strong Bad’s Cool Game for Attractive People, and the upcoming Wallace and Gromit’s Grand Adventure. They are a group of people whose passion lies in adventure games, even in a time where the typical market research would suggest this is not as profitable a route as creating a string of Call of Duty or Grand Theft Auto clones. Makes sense, since Telltale was founded by veterans from LucasArts, the company that at one time had produced masterpieces such as the Monkey Island series, Maniac Mansion, Day of the Tentacle, and yes – Sam and Max Hit the Road.

Sam and Max Ep 203
Screenshot from Sam and Max Season 2 Episode 3: Night of the Raving Dead

Having played through both season 1 and season 2 of Sam and Max, and the first episode of Strong Bad, it’s clear to me that Telltale puts out simply awesome games. Packed with humor, beautiful illustration, and quality gameplay, these adventures are truly fun to play. They also go to show that adventure games are not confined to the retro, homebrew, and Myst clone market.

Give Them a Visit

If you haven’t yet, take a moment and check out their site, there are even some free downloads to get a taste of what their fare is all about. And if you like what you see, give them some money! I know I for one would like to see a little more diversity in my gaming selection, but it can only happen if we support companies that are in it for the games, not just the revenue.

Transferring files to the Osborne 1

As any of my friends could tell you, I’m pretty big into collecting vintage computers. It costs me $70/month in storage fees, but I am just completely drawn to some of the awesome technical creativity that went into early machines before standardization took hold of the market. Mixed with the nostalgia, closeness to the hardware, and challenge of using something less than user-friendly, these old machines are great. In particular, I’m a big fan of the early portables, or luggables to be more realistic.

One fantastic machine that I’m lucky to have 3 of is the Osborne 1.

Osborne 1

It’s a pretty sweet machine, running a Z-80 processor, 64K RAM, dual 5 1/4 floppies, a monochrome 5″ screen (love this, its absolutely tiny compared to the machine), modem port, serial port, battery port, parallel port, all folding into a suitcase.

If you’re lucky enough to get the original software pack, it actually comes with the a good amount of applications, including it’s OS CP/M (the precursor to DOS), Wordstar, Supercalc, CBASIC, MBASIC, and dBase II. However, I personally love vintage machines for their games and getting them connected to other computers. The machine sports a DB-25 serial port at 1200 bps, and I knew I could transfer the modest sized library of CP/M software that can still be found on the net over the serial link. I had no terminal software though, so I did some research and came up with the following after a long struggle (please leave a comment if you have any better info or corrections):

Transferring Files to the Osborne 1

  1. Use the DB-25 port – The machine has two serial interfaces, a DB-9 and a DB-25. There is not a lot of documentation out there regarding the difference, but from what I’ve gathered, the DB-9 is not a standard RS-232 serial port, but a TTL serial port specifically designed for use with the Osborne modem (that fit snuggling in the storage bay under the left disk drive). While I’m sure it’s possible to build or use a UART to convert TTL to RS-232, it’s easier to use the DB-25, which is indeed an RS-232 port.
  2. Do not use a null modem – One of the first things I kept running into was once I managed to find a way to transmit data (see below), my remote computer (my primary Debian box) got absolutely nothing over the line. Not garbled characters from a mismatch in speed, just absolutely nothing. I thought maybe my port was bad, so I tried a new Osborne hooked to another machine (even with a new cable), and still nothing. Of course, normally you would use a null modem to switch the send/receive pins when connecting a computer to another computer over serial link, which I was doing. It turns out that the Osborne serial port was probably designed to be used as a terminal, and hence it already does the crossover. I had to directly connect my serial cable from one computer to another, with no null modem, for it to work.
  3. Set the serial speed – Depending on what revision of the Osborne 1 you have, it will either have a default speed of 300 or 1200 bps. 1200 is slow enough, so you definitely want to make sure it isn’t set at 300 bps. The CP/M disk will contain a “setup.com” program that you can run to configure various settings, including serial speed. Make sure 1200 is selected.
  4. Use PIP to initially transfer files – PIP is a fantastic utility included with CP/M that allows data to be moved from one device to another – devices being both files or physical interfaces. With PIP, we can instruct the Osborne to dump a text file from a remote computer to a local file. While PIP has no error correction and is not designed to be a full terminal, it does get the job of initially getting a terminal program onto the machine. Usage consists of “PIP <target>=<source>”. So you could use it to copy a file from drive B to drive A, “PIP A:FILE.TXT=B:FILE.TXT”, or from the serial port to a file, “PIP B:FILE.TXT=RDR:”. RDR (short for reader, as in paper tape reader, oh the historical goodness in that one) is the device name for the serial port.
  5. Get the Kermit assembly modules (in hex) onto the machine – This part I gathered from instructions on z80.eu and using files from Columbia University’s Kermit Page. Columbia University has a huge archive of versions of Kermit for different computers, including CP/M machines. These consist of two files – the base Kermit module, and then a small module that is specific to the machine. In particular, cpsker.hex (the main kermit module), and cpvosb.hex (the Osborne 1 specific code). These previous links are copies I made of these files in case you can’t reach Columbia’s site for whatever reason. Start by instructing PIP to save data from the serial port to a file, e.g. “PIP B:CPVOSB.HEX=RDR:”, then dump the contents of this file on the remote computer to the serial port. After the transfer, you will have a good copy of cpvosb.hex on your Osborne (you may have to control-d, control-c, or control-z to end the transfer if the Osborne does not quit out automatically, sometimes it worked for me and sometimes it didn’t). The larger, main kermit module is a little more tricky.
  6. Get the main Kermit assembly module – Unfortunately, the main module is a little more tricky as its bigger than PIP’s buffer, so it must write a portion of the file to disk during transfer (as opposed to the entire thing at the end). The problem is, PIP has no error correction, and when it goes to use the disk drive, you WILL lose part of the file being transferred. The transfer takes a while anyway, so having to restart because of corruption is a giant pain. Since these hex files are simply text files, I split the file into 4 parts to decrease the chance of file corruption (and decrease the time I’d have to wait for each one if I had to retransmit). After splitting them into 4 parts, I followed the same procedure as in step 5 for each file. Once they were all on the machine, I cleaned up any extra line feeds introduced by the transfer with ED (ed is so non-intuitive it makes vi look like MS Word – reference for its use can be found here), then concatenated the files together with PIP (PIP full.txt=file1.txt,file2.txt,file3.txt,file4.txt). I then had both the kermit and machine module.
  7. Compile Kermit – Luckily, CP/M comes with both ASM and DDT on disk that allow compiling and linking source files. We will use DDT to link these two modules together. The following blurb is from the Columbia page with a few comments from me:
    
    
              ddt cpsker.hex <--- At the command line, DDT your base module
    
              NEXT  PC   
              3500 0100
              -cpvosb.hex  <--- insert the machine dependent module
              -r
              NEXT  PC
              xxxx 0000
              -^C  <---- control-c
    
              A>save dd kerm411.com  <---- executable file to create
    
          "The page count ("dd") used in the SAVE command is calculated from
          the last address ("xxxx") given by DDT in response to the R command:
          drop the last two digits and add 1 if they were not zero, then
          convert from hexadecimal (base 16) to decimal (base 10): 684F
          becomes 69 hex, which is 105 decimal (5 times 16 plus 9) -- but 6700
          becomes 67 hex, or 103 decimal."


    If you receive any errors or strange messages from DDT that don't match what's listed above, it's likely your files were corrupted during transfer (this happened twice to me) and you will need to try again. Also make sure that you have enough room on your floppy to create the executable, you might have to do some disk and file juggling!

  8. Assign Logical to Physical Device - This one you'll have to do every time you restart the machine before you use Kermit. CP/M machines have logical and physical devices. We've worked with the physical serial port device RDR, but there are logical devices that are connected to physical devices to perform translations. Kermit makes use of the PTR (paper tape reader) logical device, so we need to connect this logical device to the serial port physical device. We do this using the STAT command - "STAT PTR:=RDR:".
  9. You're Done! - At this point, you have Kermit, ready to use, on your Osborne 1. There are many implementations (as seen on the Columbia page) of Kermit for every OS, so finding one for Windows, OS X or Linux won't be an issue. There are lots of guides out there for using Kermit as well, so I won't mention the commands here - they're fairly straight forward. Kermit does have error correction and multi-file transferring capabilities, so you can let it go for 30 minutes and transfer something big with no worries. It can also be used as a terminal, so you can connect over serial link to a linux shell and have some fun!
  10. The first thing I transferred once Kermit was good to go was Zork-I, there is just something about text adventures on monochrome screens that is just awesome. Zork I, II, and III for CP/M can be found here. What's nice is these archives make use of a separate z-machine from the data file, so you can copy any z3 data file (which are the vast majorities, I used this method to play The Lurking Horror) in place of zork1.dat - just remember to rename it the same thing.

    Have fun with your Osborne 1!

    Zork 1 on Osborne 1

Expanding the blog

So, the last week or so I’ve been thinking a lot about the direction I want this blog to go. I’ve decided to widen the areas I talk about to include the following:

1. Personal Entries – not so much in a “today I had an excellent ham sandwich” way, but there are often times when I want to write about things going in my life that are technology or computer science related, and I don’t have a good forum to do that. I would love to have a place where I can post thoughts and quick ideas, and I figured this blog would be a good choice.

2. Technology (non-CS) tutorials – especially in the area of retrocomputing, there are a lot of times when I’m looking to do something, can’t find a great solution that’s already been done online, so I have to experiment and find my own path. I would like to post my experiences to hopefully help someone else avoid some headaches. This happens quite a lot with working with older machines, due to the fact that there is a lot of information that simply didn’t make it to the Internet. If a computer was only semi-popular in the early 80s and not used since, it’s often hard to find information.

3. Who knows what else?

I basically want to use this blog for more things, as well as be a little more active documenting things going on with Shredz64 and the PSX64. So I hope you’ll read along and perhaps find some useful information!