Category Archives: Development

From Pong to Platformers – An Introduction to Game Physics – Part 4

Acceleration for Better Goomba Stomping

So now we understand positioning an object on a screen, moving the object around using the principles of velocity, and how to handle collisions with walls and other simple objects. While we can do quite a lot with these simple fundamentals, there is one more that is key to modeling realistic movement. We can understand a little how it works by watching how Mario jumps in the Super Mario Bros series.

Physics - Mario
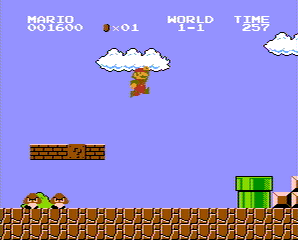
Mario jumps in an arc movement

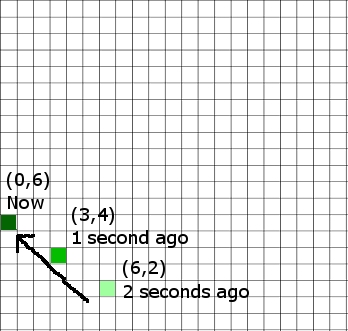
For those who haven’t played Super Mario Bros, Mario jumps in an arc. When he begins to jump, the sprite on the screen moves up very quickly, then slows at the top of the arc, then slowly starts moving back down, until he’s going the same speed as when he started the jump when hitting the ground. The reason for this movement is due to acceleration. Specifically, the game is modeling the affects of gravity, gravity being a force that causes acceleration in the downward direction.

Just as velocity is the rate of change of an object’s position (e.g. meters per second), acceleration is the rate of change of an object’s velocity (e.g. meters per second per second). Gravity is a force that causes constant acceleration in the downward direction. Because of this, though Mario starts with a velocity that causes him to move in an upward direction, acceleration downward causes this velocity to slowly decrease, then reverse, getting faster in the opposite direction.

Programatically, we can handle this the same way we do velocity. In addition to updating position with velocity, we’ll want to update velocity with acceleration – so we’ll need two more variables, AccX and AccY. During our redraw, we’ll want to update both velocity and position: (VelX = VelX + AccX) (VelY = VelY + AccY) (X = X + VelX) (Y = Y + VelY). Acceleration can be used to model many realistic scenarios besides jumping in platform adventures, such engines firing in a spaceship simulator, or shells being fired from a cannon in a tank war game.

Onto More Advanced Topics

We’ve covered position, velocity, acceleration, and basic collisions – with these basic techniques, a wide range of realistic motions can be accomplished when making your next game. There are, however, hundreds of more topics, including friction, complex collisions, fluid dynamics, light oriented (shading, diffraction, reflection), etc. However, before getting too crazy, try some of these techniques in simple games to get familiar with Newtonian Mechanics. After that, more advanced topics will be easier to handle. Have fun with you physics!

From Pong to Platformers – An Introduction to Game Physics – Part 3

Thinking Inside the Box

However, now that we have movement, we run into an issue. When we think of a classic video game, we think of boundaries, such as the edge of the screen, or floors/walls/ceilings, or other objects. In many games, such as platformers, these boundaries will stop the object from moving. In games such as Pong and Breakout/Arkanoid, the boundaries cause the object to bounce.

Physics - Breakout
In the classic game Breakout, the ball bounces off the walls, paddle, and bricks.

The idea of bouncing is the boundary only reverses one dimension of the ball’s direction, while the other dimensions remain unaffected. This is expected behavior that reflects real life, as remember that vectors are treated independently in each dimension. E.g. if the ball is traveling right and up, and hits the right wall, it should continue to travel up, but it should start traveling left. The right wall only affects the left-right dimension, it never affects the up-down direction. If the ball then hits the ceiling traveling left and up, the ceiling will only affect the up-down direction, and now the ball starts traveling left and down.

Physics - Bounce
Each wall only affects the direction in one dimension.

Looking back, our program currently has 4 variables. X (x position), Y (y position), VelX (x velocity), and VelY (y velocity). When redrawing our screen, in the case of boundaries, we would check to see if the ball has “hit” any boundaries – that is, if the coordinates of the ball (X and Y) reside in the same space as the coordinates of any of the boundaries. If so, we adjust the velocity accordingly. E.g. if the ball has an x velocity of 4 (traveling 4 pixels per redraw to the right) and a y velocity of -2 (traveling 2 pixels per redraw downwards), and hits the right wall, the x velocity will be reversed – that is, multiplied by -1 (VelX = VelX * -1). So now the x velocity is -4 (traveling 4 pixels per redraw to the left), and we’ve achieved our bounce. If we apply this boundary check to a movable paddle, we now have pong. If we apply this boundary check to bricks at the top of the screen, we now have breakout as well!

Onto Part 4

From Pong to Platformers – An Introduction to Game Physics – Part 2

Velocity

Velocity is a fancy word for speed with a particular direction. Going 88 MPH would be speed. Going north at 88MPH would be velocity. But forgetting the direction component for a moment, speed is measured in distanced traveled over time. For example, when we say 88 Miles per Hour, we’re saying the object is moving a distance of 88 miles over a period of an hour – i.e. the object is changing its position by that much in an hour.

Remember, our video game object has position too – it has its coordinates. If we introduce velocity into our game, we now give our object the ability to move by the laws of physics. If we redraw our object once a second, and the object is going 5 pixels right per second, we would be adding 5 to our X coordinate (the value stored in our X variable) every second, then redrawing the object. If we want it to move faster, we increase the speed, 6 pixels per second, 7 pixels per second.

Don’t Forget the Vector!

Vector is another mathematical term for a quantity with a direction involved. Remember, velocity is speed with a direction, so it is a vector. There is a helpful property of vectors that allows us to split them up by dimensions – that is, if something is moving in two dimensions at once (north and west, up and north, south and east and down), we can handle each direction separately. If something is moving north and west, we can talk about how much it’s moving in the north direction and how much it’s moving in the east directly independently. In our video game case, we can say “okay, the pong ball is traveling -3 pixels per second in the X direction, and 2 pixels per second in the Y direction). That means every second we’re going to subtract 3 from our X variable, and add 2 to our Y variable, then redraw the ball. The movement of the ball would appear to be going diagonally up and left, as seen here:

Physics - Velocity
We handled each dimension separately, but the end result was the diagonal movement.

Now we can store our X velocity and Y velocity into variables too (for example, velX and velY). So, every time we redraw the screen, we are going to add velX to X (x = x + velX), and velY to Y (y = y + velY). So if we have a very large velX, the ball will be moved across the screen very fast from left to right. If we have a very large negative velY, the ball will be moved down the screen very fast. And we don’t need to press the key each time, our velocity will do the work for us through simple addition (or subtraction if we are adding a negative number).

If we wanted to design a fun experiment, we could assign our arrow keys to change velocity. Pressing left would subtract one from velocity in the X direction, pressing up would add one to velocity in the y direction, etc. This would have the effect of making the ball move in a direction more quickly the more you press the arrow in the same direction, or slow down and start moving backwards if you press the arrow in the opposite direction. Not pressing the arrows would simply keep the ball doing whatever it was doing – e.g. traveling in whatever direction it was before.

Onto Part 3

From Pong to Platformers – An Introduction to Game Physics – Part 1

Before we get started, I feel the need to point out that this entry will in no way even begin to approach the territory of being comprehensive in the study of video game physics. This is targeted toward those who have little background in physics and is very much a starter tutorial. In general, the better and more realistic the game physics, the closer you’re getting to actual physics – and that’s a lifetime study in itself. However, there are some basic tips and tricks to know when dealing with intro action and arcade style games.

Newton and his Mechanics

While games have gone from simple squares on the screen to 2D sprites to 3D-super-rendered-polygon-ray-traced-blammo-wow objects, the actual science behind their movement on the screen has stayed relatively the same – mainly because their movement is based on the movement we’re used to, what we see all around us every day. We reproduce it in our video games (for the most part) because it’s natural and makes sense to us. We’re mirroring physics! Specifically Classical (or Newtonian) Mechanics. We generally don’t need to take into account relativity or quantum mechanics when making Mario jump from one green pipe to another.

So to understand how the pod in Lunar Lander works, we need to understand how a real lunar lander would work. But let’s start out more simply.

Mass and Position

What is mass? This is a large, fundamental question that involves inertia, resistance to movement, the amount of force necessary to move the object, etc. But we don’t need to get that deep into it. Mass is physical stuff. You have mass, a ball has mass, the planet has mass, your dog has mass, Catholic churches have Mass, etc. (ba-dum-dum). Anything physical has mass. It doesn’t start moving for the most part, it stays where it is until something pushes it (in the case of a person, your muscles). If it’s already moving, it doesn’t stop moving unless something stops it (a wall, friction, a large rope, etc). It basically keeps doing whatever it’s already doing.

Reproducing an object that sits there and does nothing is very easy to do in a video game. Simply create a representation of an object, whether it be a colored square (Pong), a bitmap graphic (Mario), or a polygon object (Lara Croft) and put it on the screen. The actual way to do this is outside this tutorial (Check out Creating a Blackberry Game if you’d like to see how to do it in Java). Just as in the real world an object has a position, in the video game world, the object will have a position too – a coordinate on the screen. In the below example, we use a simple object that is 1 pixel in size for a pong-like game.

Physics - Object Location
The green pixel is our pong ball

When programming this, we would need to store the dot’s X coordinate and Y coordinate into variables, in this case, store a 6 in X, and a 2 in Y. If we wanted to use the arrow keys to move this object, we would simply add or subtract from the coordinates as the appropriate key is pressed (e.g. pressing up -> Add 1 to Y, pressing down -> Subtract 1 from Y, pressing right -> Add 1 to X, pressing left -> Subtract 1 from X). Then redraw the object in its new location. Our drawing routine would always just take the values and of the X and Y variables and draw a pixel at those coordinates on the screen.

While this would be enjoyable for 2-3 seconds, it would overall be a fairly boring game. We would be doing physics’ job in this case, telling the object how to move every step of the way. We want physics to carry its load. So let’s program in another property.

Onto Part 2

Creating a Blackberry GPS Tracker

As I mentioned in my article about Creating a Blackberry Game, I love this mobile phone and writing programs for it. The device has a serious amount of untapped potential. That’s not to say the phone isn’t already a great tool for its intended purposes (I don’t think I could make it without mine these days), but with the capabilities it has, there are a lot of creative ways it could be used for unconventional purposes.

Global Positioning System

One great feature of many modern Blackberrys is the built in GPS. This is an awesome technology for navigation – I don’t have a GPS in the car and my phone has saved my butt on a number of occasions. However, past that, think about the power this really gives. We’re starting to take positioning for granted these days, but the ability to pinpoint your exact location wherever you are is amazingly powerful. And not only for navigation – we have seen a number of very inventive programs popping up lately from trackers that pinpoint a lost/stolen phone, to photo tagging to attach a location to a picture taken. I’ve had lots of conversations with people as well who have great ideas for unique uses of GPSes. We’re definitely not even close to exhausting this functionality in the Blackberry.

Writing a GPS Program

When I first got my phone, I wanted to write a program to make use of the GPS. I decided I’d write a little tracker program, basically to continually read my current coordinates and post them to a website in realtime (that’s the other amazing piece about a Blackberry, the fact that you have an Internet connection whenever in cell range). The website would display these points on a google map, and people could see my current location and where I’d been (and how fast I was going!). It was a fun project, amazingly easy, and worked right off the bat!

Below is a very quick and dirty program to get the job done. It is not meant to be a polished product – it was a quick test, and I present it here as information on how to grab coordinates and upload them to a website. If you decide to make your own project, you’ll want to write the code a little more cleanly and organized – but this should give some tips on how the libraries are used. I’ve added lots of commenting to explain things as I go.

Also – a portion of the GPS code is grabbed from the RIM site I believe, though it was a long time ago and I’m not sure where. No disrespect to any code I’ve copied – if you find the original source, please post it and I’ll credit it.


tracker.java

package com.syntheticdreams.tracker;

/* This project makes use of many standard javax libraries, especially in reading the GPS.
** The microedition package in javax contains a number of mobile device related libraries, including the
** location package, which has methods specially designed for working with coordinates and 
** pulling them from a GPS.  The Blackberry supports the use of this package interfacing with its GPS (for 
** providers that have not locked the phone.  Verizon has, until recently, locked the GPS of many of its models
** from use by third party applications.)  The rest of our package importing is mainly for the user interface. */
import net.rim.device.api.ui.*;
import net.rim.device.api.ui.component.*;
import net.rim.device.api.ui.container.*;
import net.rim.device.api.system.*;
import javax.microedition.location.*;
import javax.microedition.location.Location.*;
import javax.microedition.location.Criteria.*;
import javax.microedition.io.*;
import java.util.*;

// The UiApplication is a class designed for presenting a user interface to the user and maintaining screens on a stack.  
// See Creating a Blackberry Game - Part 2 for more info (http://www.toniwestbrook.com/archives/71)
public class tracker extends UiApplication 
{
    // Our main method is always called first, starts the ball rolling
    public static void main(String[] args)
    {
        // Create a new instance of the main "tracker" class, pushes the main screen onto the stack
        tracker trackerApp = new tracker();

        // Enter the event dispatcher to intercept key and trackball events
        trackerApp.enterEventDispatcher();
    }

    public tracker() 
    {    
        // See startScreen class below, our main screen where the magic takes place.  Push it onto the stack so
        // the user sees it and the instance of the class starts running and processing.
        pushScreen(new startScreen());
    }
} 

// Our only screen to be pushed on the screen stack
final class startScreen extends MainScreen
{
    // A timer that will continually poll the GPS
    Timer updateTimer = new Timer(); 
        
    // The specific task for our timer where the dirty work takes place
    TimerTask updateTask = new TimerTask()
    {       
        // The run method is what is actually run by the timer every time it resets
        public void run()
        {
            LocationProvider lp; // LocationProvider does the actual work of reading coordinates from the GPS
            Location currentLoc; // Stores component information of our position
            Criteria cr = new Criteria(); // Settings for the GPS - we can read it at different accuracy levels
            HttpConnection httpConn;  // An HTTP socket connection class to send our results to a webserver
            String getStr; 

            // I basically set no requirements on any of the horizontal, vertical, or power consumption requirements below.  
            // The distance components are set in meters if you do want to establish accuracy - the less the accuracy, the 
            // quicker and more likely a successful read (I believe). 
            // You can also set power consumption, between low, medium, high (or no requirement)
            // There are also a number of other settings you can tweak such as minimum response time, if altitude is required,
            // speed required, etc.  It all depends on the exact application you're writing and how specific you need the info to
            // be.  For our purposes, a rough coordinate is good enough.
            cr.setCostAllowed(true);
            cr.setHorizontalAccuracy(javax.microedition.location.Criteria.NO_REQUIREMENT);
            cr.setVerticalAccuracy(javax.microedition.location.Criteria.NO_REQUIREMENT);
            cr.setPreferredPowerConsumption(javax.microedition.location.Criteria.NO_REQUIREMENT);

            try
            {
                // Get a new instance of the location provider using the criteria we established above.
                lp = LocationProvider.getInstance(cr);
 
                // Now populate our location object with our current location (with a 60 second timeout)
                currentLoc = lp.getLocation(60);
            }

            // If we hit the timeout or encountered some other error, report it.
            catch(LocationException e)
            {
                Dialog.alert("Error getting coordinates");
                return;
            }

            // If reading the GPS was interrupted, report it
            catch(InterruptedException e)
            {
                Dialog.alert("GPS Interrupted!");
                return;    
            }

            // If we made it here, we got a successful read.  I transmit it to a webserver via a simple querystring.
            try
            {
                // I build the querystring here             
                // set the "lat" querystring var with the latitude from getLatitude
                getStr = "lat=" + currentLoc.getQualifiedCoordinates().getLatitude();

                //lon with longitude
                getStr = getStr + "&lon=" + currentLoc.getQualifiedCoordinates().getLongitude();

                // alt with altitude
                getStr = getStr + "&alt=" + currentLoc.getQualifiedCoordinates().getAltitude();

                // vel with speed
                getStr = getStr + "&vel=" + currentLoc.getSpeed();

                // Now I establish an http connection the webserver running a server side script that can read the values from
                // the querystring and save them to a database.  In my case, I had a simple ASP page that wrote them to a MSSQL
                // database - this database being read by another webpage that printed said coordinates out on a google map.  
                // But you could do the same with PHP, PERL, or any other server side language of your choice.
                httpConn = (javax.microedition.io.HttpConnection) javax.microedition.io.Connector.open("http://www.yourwebsitehere.com/yourpage.asp?" + getStr);

                // Just an easy GET with a querystring.
                httpConn.setRequestMethod(HttpConnection.GET);

                // Set HTTP values
                httpConn.setRequestProperty("Connection","close");
                httpConn.setRequestProperty("Content-Length","0");

                // Make the request (e.g. send the data)
                httpConn.getResponseCode();

                // Close the socket
                httpConn.close();
            }

            // If there was an error contacting the webserver, post it
            catch (java.io.IOException e)
            {
                Dialog.alert("Error contacting web server");
                return;
            }
        }
    };

    // Our main screen's constructor
    public startScreen()
    {
        super();

        // Set the window's title
        LabelField title = new LabelField("GPS Tracker", LabelField.ELLIPSIS | LabelField.USE_ALL_WIDTH);
        setTitle(title);

        // Feel free to snazz up your program with your own messages or real time info from the GPS
        add(new RichTextField("Starting transmission..."));

        // Add the update task to the update timer, running it starting in 10 milliseconds, and then every
        // 240000 milliseconds (4 minutes)
        updateTimer.scheduleAtFixedRate(updateTask, 10, 240000);                   
    }
    
    // Cleanup on close
    public boolean onClose()
    {
       Dialog.alert("Transmission Ended!");
       System.exit(0);
       return true;    
    }
}

Nothing too bad – but very powerful! I hope this helps a bit on the road to making cool GPS applications!

An Introduction to Recursion

I remember the first time I formally encountered recursion – it was sophomore year of high school and I was watching as my CS teacher, Mr. Kendall Chun, was explaining how instead of using loops, a function could repeatedly perform an action by calling itself. The concept at the time just completely blew me away. It seemed to me, like I think it does to a number of people when they first learn about it, almost magic. I used it on more of a faith basis until I became more comfortable with it – and now, like any programmer, it is a standard part of my arsenal.

What is Recursion?

While recursion is a powerful technique, there is definitely nothing mystic about it. Simply put, recursion is when a function uses itself in it’s own definition. It can be a little easier to demonstrate by showing an example.

Non-Recursive Function

First off, remember that a function is a dependence between two values – or in plain terms, it’s a “machine” where input goes into it, and output comes out. Usually that output is generated by doing something to the input.

Take f(x) = x+3. This is a simple function that says whatever I put in, I get that plus 3 out – so if I put 7 in, I get a 10 out. f(7) = 7+3 = 10. No biggie, the function is defined in terms of x – we put a 7 in for x, we got a 10 out – no recursion yet.

Recursive Function

The most classic example of a recursive function is the factorial function. For those unfamiliar, the factorial function multiplies all integers less than or equal to itself, and is represented by an exclamation mark. So 5!, or 5 factorial, is equal to 5 * 4 * 3 * 2 * 1, or 120.

Why is this recursive? Check it out:

  • 5! = 5 * 4 * 3 * 2 * 1
  • 4! = 4 * 3 * 2 * 1
  • 3! = 3 * 2 * 1
  • 2! = 2 * 1
  • 1! = 1

So I’ve listed the factorials of each of these numbers out, so what? Well, if 4! = 4 * 3 * 2 * 1, then we could say:

  • 5! = 5 * 4!
  • 4! = 4 * 3!
  • 3! = 3 * 2!
  • 2! = 2 * 1!

As can be seen, any factorial is the number going into it times the factorial of one less that number. This means that factorial uses itself as its definition –

f(x) = x * f(x-1)

Factorial is the number going into it (variable x) times the factorial of the number minus 1. So factorial of 5, or f(5), is 5 * f(4). What’s f(4)? 4 * f(3). f(3) = 3 * f(2), and f(2) = 2 * f(1).

The Base Case

The issue is that for recursion to be useful, it has to STOP somewhere. In the factorial example, nothing stops it. We would say f(1) = 1 * f(0), f(0) = 0 * f(-1), f(-1) = -1 * f(-2), ad infinitum. Endless loops are no fun (unless the basis of annoying pranks), so we need a way of saying STOP! This is where the “Base Case” comes in. It is simply a point during execution, or in the definition of the function, that says “no more calling yourself, stop the looping madness”.

In the case of factorial, it’s f(0). f(0) = 1. Period. It doesn’t involve itself any longer, it just returns 1 – it’s a static value, an axiom, a solid rock, where the buck stops. Every recursive function needs a base case.

Full Execution

So the full definition of our factorial function is

f(0) = 1
f(x) = x * f(x – 1)

That means, if we call f with 0, we get 1, otherwise we perform the second operation. Let’s try it out with 4. We should get 4 * 3 * 2 * 1 = 24.

  • f(4) = 4 * f(3)
  • f(3) = 3 * f(2)
  • f(2) = 2 * f(1)
  • f(1) = 1 * f(0)
  • f(0) = 1

Now we know what each function returns, we can fill in the unknown values

  • f(1) = 1 * f(0) = 1 * 1 = 1
  • f(2) = 2 * f(1) = 2 * 1 = 2
  • f(3) = 3 * f(2) = 3 * 2 = 6
  • f(4) = 4 * f(3) = 4 * 6 = 24

It worked! And is very easy to implement in whatever programming language you happen to be using. Once you become comfortable using recursion, you’ll find it’s useful all over the place, because the world around us uses recursion constantly – it is a large part of math and our Universe.

Other Fun Examples

Looking for some more examples of recursion?

  • The Fibonacci Numbers – 0, 1, 1, 2, 3, 5, 8, 13, 21, etc. Each number is defined by adding the two numbers before it – so f(x) = f(x-1) + f(x-2). Double recursion – it makes use of itself twice! Our base cases are f(0) = 0 and f(1) = 1.
  • Any Geometric Series – The powers of 2 for example – 1, 2, 4, 8, 16, 32, 64, 128, 256. Each number is the previous number times 2. We could define this using exponents, but let’s do it with recursion! f(x) = 2 * f(x-1). Base case f(0) = 1.

Recursion rocks, so try finding some situations where loops are used that you could use recursion instead – it’s a lot more fun!

Creating a Blackberry Game – Part 6

Looking for part 5?

Let’s Hear It!

Our game is almost done – the only part left is the sound (and vibration) processing. This is a fairly simple class as well – again, most of the low level processing is done already by the Blackberry. However – you may want to play with the methods in this class. We have functionality for playing a midi file – and we could also have functionality for playing a wav file as well, but I haven’t included it. The reason – on my 8830, the sound engine (at least the way I was using it), could only seem to mix one sound at a time, and completely stopped the other sound if a second one was played. There may be specific methods to mix two sounds together that I did not research, or otherwise it’s a limitation/bug of the 8830. So, if music was playing, and I then played a wav sound effect, the music would stop.

I overcame this by using the Alert.startAudio method. This takes frequency/duration pairs from an array and plays simple sounds with it. When this method is used, it does indeed mix the audio with the midi playing in the background, so I stuck with it. It makes for less sophisticated sound effects, but it helps us for now.

Additionally, I wanted to include vibration in the game, so I included a small method for triggering this off. Vibration is used for when spaceships explode, either yours or the enemy’s.

SND.java

package com.synthdreams.GalacticBlast;

import net.rim.device.api.ui.component.Dialog;
import java.io.InputStream;
import java.lang.Class;
import javax.microedition.media.Manager;
import javax.microedition.media.Player;
import net.rim.device.api.system.Alert;

// Sound engine
class SND {
    
    Player _musicPlayer; // Java media player
    
    SND() { }
    
    // Play a midi file for background music
    void playMusic(String passMusic)
    {
        try
        {
            // Set InputStream to a midi file included as resource, as specified by
            // passMusic
            InputStream in = getClass().getResourceAsStream("/" + passMusic);            
            
            // Create a media player with mime type of audio/midi using our inputstream
            _musicPlayer = javax.microedition.media.Manager.createPlayer(in, "audio/midi");
            
            // Ready the data and start playing it.  To loop indefinitely, we set loopcount
            // to -1.
            _musicPlayer.realize();
            _musicPlayer.prefetch();
            _musicPlayer.setLoopCount(-1);
            _musicPlayer.start();

        }
        catch (Exception e)
        {
            Dialog.alert("Error playing music");
        }   
    }
    
    // Stop playing music
    void stopMusic()
    {
        try
        {
            // Tell player to stop playing
            _musicPlayer.stop();
            
        }
        catch (Exception e)
        {
            Dialog.alert("Error stopping music");
        }
        
        // Then release the data and close out the player
        _musicPlayer.deallocate();
        _musicPlayer.close();
    }
    
    // The Playsound method plays a simple combinations of tones to simulate a firing
    // noise.  This was necessary, as due to a bug or limitation of the BlackBerry 8830 
    // (the phone I do my testing on), playing a WAV file stopped the midi player and
    // any other sound effects.  Player doesn't appear to mix properly (if at all).  However,
    // a midi file can be played while using the Alert objects startAudio method which
    // can play a sequence of tones, so this is what we've done for now.
    void playSound()
    {
        // A sequence of frequencies and durations (eg 1400hz for 15ms, 1350hz for 15ms, etc)
        short[] fire = {1400, 15, 1350, 15, 1320, 20, 1300, 20, 1250, 25, 1200, 35};
        
        try
        {
            Alert.startAudio(fire, 100);
            
        }
        catch (Exception e)
        {
            Dialog.alert("Error playing sound effect.");
        }   
        
    }
    
    // Activates the phone's vibration functionality for a specific number of ms
    void vibrate(int passMilli)
    {
        Alert.startVibrate(passMilli);
    }
} 

Nothing too complex at all going on here. You may wonder what all the player initialization methods are doing – they deal mainly with making sure the sound data is available and buffered before playing. Just call them in order and you’re good to go.

That’s All Folks!

At this point, you have all the basic functionality necessary for making whatever kind of Blackberry game you’d like. Your logic may have to be much more complex, and you may have to include additional classes to accommodate everything, but the basic principles stay the same. Also – all the classes used here are unsigned and available without a license from Research in Motion, which means you can make, play, and distribute these games for free.

Feel free to comment if you have any questions, or even suggestions! These were my own experiences and suggestions with creating a Blackberry game, but you might have your own! Thanks for checking out this tutorial, good luck – and most importantly, have fun!

Creating a Blackberry Game – Part 5

Looking for part 4?

Let’s See Our Game

Now that our logic is done, we have a few holes in the program where calls are made to graphics and sound processing. By isolating (for the most part, as much as our program allows) graphics and sound processing from the rest of the program, it offers for a little more portability. In general, this isn’t too big of an issue in Java since Java itself is cross platform, but even so we run into areas where certain libraries might be available for one setup and not for others (for example, our program in which we use Blackberry specific libraries, wouldn’t be valid in a non-Blackberry environment). For systems where processor speed and memory are in ample supply (which are most systems these days – as compared to an MCU or retro environment when you’re dealing with 64K of RAM), it’s a good practice to isolate things out like this – it makes porting a lot easier (Think Windows -> Mac & Linux, or PS3 -> XBox & Wii, that kind of thing).

Anyway, game programming philosophy aside, let’s dig into the graphics functionality of GFX. GFX is actually fairly simple since most of the low level graphic processing is done by the Blackberry itself. We don’t have a lot of ways to get close to the hardware, which is a good and bad thing – but for us here, the built in graphics functionality of the Blackberry is good enough and saves us work.

Besides some initialization routines, the GFX class consists mainly of the process method, which takes a handle to the graphics of the current screen from Gameplay. This handle indirectly allows us to write to the screen memory through simple graphic methods like drawBitmap and drawText. The overall algorithm is to first write the background (aligned properly, it moves every update) to the screen, then draw all objects, then the score and our hero’s health meter. There is some math for doing coordinate and dimension calculations, but everything is fairly straightforward.

GFX.java

package com.synthdreams.GalacticBlast;

import net.rim.device.api.system.Bitmap;
import net.rim.device.api.system.Display;
import net.rim.device.api.ui.*;
import java.util.Vector;

// The GFX class is our game's graphics engine with all the drawing routines
class GFX 
{
    int _backPos, _backSpeed; // Background position and speed
    Bitmap _backgroundBM; // The bitmap for the background
    Bitmap _healthBM; // The bitmap for the health meter
    Font _gameFont; // The font used for drawing score and lives
    
    GFX() 
    {
        // First see if we can get the BBCondensed font at size 16 for our game font.
        // If not, we just go with the default, but all Blackberrys should have this font.
        try
        {
            _gameFont = FontFamily.forName("BBCondensed").getFont(FontFamily.SCALABLE_FONT,16);
        }
        catch (Exception e) { }
        
        // Load the health bitmap from health.png
        _healthBM = Bitmap.getBitmapResource("health.png");
    }
    
    // Get current background position
    public int getBackPos() { return _backPos; }
    
    // Method that sets the bitmap for the background and sets the scroll speed
    public void initBackground(String passBackground, int passSpeed)
    {
       _backgroundBM = Bitmap.getBitmapResource(passBackground);
       _backPos = 0;
       _backSpeed = passSpeed;
    }
    
    // Primary function for the graphics engine, draws all the objects, text, health, etc
    public void process(Graphics passGraphics, Vector passObjects, int passScore, int passLives)
    {
        // Draw our background at the correct position
        passGraphics.drawBitmap(0,0, Graphics.getScreenWidth(), Graphics.getScreenHeight(), _backgroundBM, 0, _backPos);
        
        // Move our background.  
        _backPos -= _backSpeed;
        
        //If we're at the beginning of our bitmap, reset to end
        if (_backPos < 0)
        {
           _backPos = _backgroundBM.getHeight() - _backSpeed;
        }
        
        // If we're within screenheight of the end of our bitmap, we need to draw another copy to fill in the blank
        if (_backgroundBM.getHeight() - _backPos < Graphics.getScreenHeight()+_backSpeed)
        {
           passGraphics.drawBitmap(0, _backgroundBM.getHeight() - _backPos - _backSpeed, Graphics.getScreenWidth(), Graphics.getScreenHeight(), _backgroundBM, 0, 0);
        }
        
        // Now draw each of our objects to the screen
        for (int lcv = 0 ; lcv < passObjects.size() ; lcv++)
        {
            passGraphics.drawBitmap(((OBJ) passObjects.elementAt(lcv)).getX(),
                                    ((OBJ) passObjects.elementAt(lcv)).getY(),
                                    ((OBJ) passObjects.elementAt(lcv)).getBitmap().getWidth(),
                                    ((OBJ) passObjects.elementAt(lcv)).getBitmap().getHeight(),
                                    ((OBJ) passObjects.elementAt(lcv)).getBitmap(),
                                    0, 0);
        }
        
        // Draw score
        String zeroPad;
        
        // We want to pad the score with 0s
        zeroPad = "";
        if (passScore < 10000)
          zeroPad += "0";        
        if (passScore < 1000)
          zeroPad += "0";
        if (passScore < 100)
          zeroPad += "0";
        if (passScore < 10)
          zeroPad += "0";
          
        // Draw score and lives in white with the game font
        passGraphics.setColor(0xFFFFFF);
        passGraphics.setFont(_gameFont);
        passGraphics.drawText("Score: " + zeroPad + passScore, Graphics.getScreenWidth()-93, 2);
        passGraphics.drawText("Lives: " + passLives, 7, Graphics.getScreenHeight() - 20);
        
        //Draw health, with width dependent on hero's life
        if (((OBJ) passObjects.elementAt(0)).getLife() > 0)
            passGraphics.drawBitmap(7, 7, _healthBM.getWidth() * ((OBJ) passObjects.elementAt(0)).getLife() / 5, _healthBM.getHeight(), _healthBM, 0, 0);
    }

}

As can be seen, nothing major happening here. The only weird part is how we draw the background. We basically have a long bitmap that scrolls in the background. When it hits the end of the bitmap, it needs to repeat it. It does this by continuing to scroll the original bitmap, and then filling in the whitespace with a second bitmap, placed flush to the first bitmap. Since we’re dealing with random stars, its hard to make out any seams on the screen. If you were doing something with a more ordered/textured background, you’d need to make sure the top of the bitmap flowed well with the bottom of the bitmap.

Graphics are done – you should be able to disable your audio calls and get a playable game at this point! It should look something like this (only with your graphics, of course)

Onto our final part, audio…

Creating a Blackberry Game – Part 4

Looking for part 3?

Cue the Objects

Just like Object is the root for all classes in Java, OBJ is the root class for all of our classes in our game that represent sprites on the screen. This is where object oriented programming really shines through for game creation. By setting up a parent class, we can assign properties that are common to all our sprite objects, like position, velocity, a bitmap, etc. Then we can define classes for each individual type of object, like a Hero class, EnemyDrone class, and Photon class that will extend our base OBJ class. This allows them to inherit common properties, and add their own that are specific to them (For example, our hero will have a properties for how many lives it has left, which no other class has, as the rest of the objects simply go away after being destroyed). Since sometimes we work with our objects as OBJ in a vector, we also have a “type” property that is simply an identifying string that allows us to easily determine exactly what our object is (hero, enemy, or photon).

In addition to our OBJ classes, we also have a few static methods that are designed to work with multiple objects as opposed to any single object. CollisionDetect will loop through all objects and check for bounding box collisions, while cleanObjects will loop through all objects and remove dead ones from our object vector.

OBJ.java

package com.synthdreams.GalacticBlast;

import net.rim.device.api.system.Bitmap;
import net.rim.device.api.ui.Graphics;
import java.util.*;

// OBJ is our root class for all objects, it defines behaviors and properties
// that are the same for all objects, whether its the hero, enemies, or photons
class OBJ 
{
    // Objects can have different states, these are general ones
    public static int STATE_NORMAL = 0;  // Object is alive and functioning normally
    public static int STATE_HIT = 100; // Object just got hit, flash red
    public static int STATE_DYING = 1000; // Object is dying, show an explosion
    
    int _posX, _posY, _velX, _velY;  // All objects have position and velocity
    int _life, _value, _state; // All objects have life, point value, and a current state
    OBJ _parent; // All objects can have a parent (e.g. a photon belongs to the object that shot it)
    String _type; // Type is a string that stores what the object is for easy reference
    Bitmap _bitmap; // Bitmap to be drawn for the object
    
    // Objects are initialized globally with a position
    OBJ(int passX, int passY) 
    {
        _posX = passX;
        _posY = passY;
        _velX = 0;
        _velY = 0;
        _life = 1;
        _value = 0;
        _state = STATE_NORMAL;
        _type = "generic";
        
    }
    
    // Setters and getters
    public int getX() { return _posX; }
    public int getY() { return _posY; }
    public void setX(int passX) { _posX = passX; }
    public void setY(int passY) { _posY = passY; }
    public int getVelX() { return _velX; }
    public int getVelY() { return _velY; }
    public void setVelX(int passX) { _velX = passX; }
    public void setVelY(int passY) { _velY = passY; }
    public int getLife() { return _life; }
    public void setLife(int passLife) { _life = passLife; }
    public int getValue() { return _value; }
    public int getState() { return _state; }
    public void setState(int passState) { _state = passState; }
    public String getType() { return _type; }
    public Bitmap getBitmap() { return _bitmap; }
    public OBJ getParent() { return _parent; }
    
    // Process, think, and damager are all specific to the object, so these are blank
    public void process() { }
    public void think(Vector passObjects) { }
    public void damage() { }
    
    // In our game, firing means shooting a photon and playing the zap tone, this is the same
    // for all objects
    public void fire(Vector passObjects, OBJ passParent, int passVelocity)
    {
        Photon tempPhoton;
        
        // If the photon is going up, start it from the top of the object firing it.
        // If its going down, start it from bottom of object firing it
        if (passVelocity > 0)
            tempPhoton = new Photon(passParent.getX(),passParent.getY()+passParent.getBitmap().getHeight(), 0, passVelocity, passParent);        
        else
            tempPhoton = new Photon(passParent.getX(),passParent.getY(), 0, passVelocity, passParent);    
                
        // set X coordinate of photon to the middle of the object firing it
        tempPhoton.setX(tempPhoton.getX() + passParent.getBitmap().getWidth()/2);
        
        // Add the photon object to our object vector
        passObjects.addElement(tempPhoton);
        
        // Play a zap tone
        GamePlay.snd.playSound();
        
    }
    
    
    // Collision detection routine using an AABB test (Axis Align Bounding Box).  This
    // is a quick and easy test great for games with simple squarish sprites which simply
    // looks to see if the bounding boxes overlap in any way.
    public static void collisionDetect(Vector passObjects)
    {
        OBJ tempObject1, tempObject2; // temporarily points to the two objects being tested
        boolean intersect, check; // flags during testing
        
        // Loop through all objects in our vector
        for (int lcv = 0 ; lcv < passObjects.size() ; lcv++)
        {
            // Set tempObject1 to the current object
            tempObject1 = (OBJ) passObjects.elementAt(lcv);
            
            // Now loop from the current object to the end of the vector
            for(int lcv2 = lcv ; lcv2 < passObjects.size() ; lcv2++)
            {
                // Set tempObject2 to the current object of the nested loop
                tempObject2 = (OBJ) passObjects.elementAt(lcv2);
                
                // See if we need to check for collision (e.g. some objects dont matter if 
                // they collide, enemy with enemy or fire with fire for example)
                
                // Assume we dont need to check
                check = false;
                
                // Hero and enemy would be something to check for
                if (tempObject1.getType() == "hero" && tempObject2.getType().startsWith("enemy"))
                    check = true;
                
                // Hero and enemy fired photons would be something to check for    
                if (tempObject1.getType() == "hero" && tempObject2.getType().startsWith("fire") && tempObject2.getParent().getType().startsWith("enemy"))
                    check = true;
               
                // Enemy and hero fired photons would be something ot check for     
                if (tempObject1.getType().startsWith("enemy") && tempObject2.getType().startsWith("fire") && tempObject2.getParent().getType() == "hero")
                    check = true;
                
                // If our check flag is set to true, and the state of the objects is normal
                // (e.g. an object in a hit or exploded state can't collide with something),
                // then lets check for the actual collision
                if (check && tempObject1.getState() == 0 && tempObject2.getState() == 0)
                {
                    
                    // We assume the two objects collided
                    intersect = true;
                    
                    // Left and Right sides of bounding box check
                    if (!(Math.abs((tempObject1.getX() + tempObject1.getBitmap().getWidth()/2) - (tempObject2.getX() + tempObject2.getBitmap().getWidth()/2)) <= tempObject1.getBitmap().getWidth() / 2 + tempObject2.getBitmap().getWidth() / 2))
                        intersect = false;
    
                    // Top and Bottom sides of bounding box check
                    if (!(Math.abs((tempObject1.getY() + tempObject1.getBitmap().getHeight()/2) - (tempObject2.getY() + tempObject2.getBitmap().getHeight()/2)) <= tempObject1.getBitmap().getHeight() / 2 + tempObject2.getBitmap().getHeight() / 2))
                        intersect = false;
    
                    // If the objects collided, damage each one.
                    if (intersect)
                    {
                        tempObject1.damage();
                        tempObject2.damage();
                    }                    
                }
            }
        }    
    }

    // Clean up objects that have died or are way off screen.
    public static int cleanObjects(Vector passObjects)
    {
        OBJ tempObject; // Temporary points to object we're checking
        boolean delFlag; // Flag if we should get rid of it or not
        int scoreAdd; // Aggregate points to add to user's score
        
        // Start out with no points added
        scoreAdd = 0;
        
        // Loop through all objects in our vector
        for (int lcv = 0 ; lcv < passObjects.size() ; lcv++)
        {
            // Set tempObject to current object
            tempObject = (OBJ) passObjects.elementAt(lcv);
            
            // Assume we're not deleting it
            delFlag = false;
            
            // Check the object's state.  If its been dying for 10 refreshes, its
            // time to get rid of it.
            if (tempObject.getState() > STATE_DYING + 10)
            {
                // In the case of our hero, the player has lives, so if the hero
                // dies, we need to check to see if any lives are left before
                // quitting the game
                if (tempObject.getType() == "hero")
                {
                    // If there are lives left...
                    if (((Hero)tempObject).getLives() > 0)
                    {
                       // Decrement the number of lives left, set state, bitmap,
                       // and position back to normal
                       ((Hero)tempObject).setLives(((Hero)tempObject).getLives()-1);
                       tempObject.setLife(5);
                       tempObject.setState(STATE_NORMAL);
                       tempObject.setX(Graphics.getScreenWidth() / 2);
                       tempObject.setY(Graphics.getScreenHeight() - 50);   
                       tempObject._bitmap = Bitmap.getBitmapResource("herogame.png");
                    }
                    else
                    {
                       // The player is out of lives, lets destroy the hero (which will
                       // end the game)
                       delFlag = true;    
                    }
                }
                else
                {
                    // Enemies only have 1 life, so they are set to be deleted, and we
                    // add their value to the total score the player got this cleanup.
                    delFlag = true;
                    scoreAdd += tempObject.getValue();
                }
            }
            
            // If the object is a photon...
            if (tempObject.getType() == "firephoton" && delFlag == false)
            {  
                // Delete if off left side of screen
                if(tempObject.getX() + tempObject.getBitmap().getWidth() < 0)
                    delFlag = true;
                
                // Delete if off right side of screen    
                if(tempObject.getX() > Graphics.getScreenWidth())
                    delFlag = true;
                    
                // Delete if off top of screen
                if(tempObject.getY() + tempObject.getBitmap().getHeight() < 0)
                    delFlag = true;
                
                // Delete if off bottom of screen    
                if(tempObject.getY() > Graphics.getScreenHeight())
                    delFlag = true;            
            }
            
            // We need to check for enemies that are way off screen.  
            // Normally enemies will swarm around here, but there are 
            // also kamikaze enemies that will aim toward the hero,
            // and if miss, keep going forever
            if (tempObject.getType() == "enemydrone" && delFlag == false)
            {  
                // Check each of the four sides of the screen, if an enemy is
                // past any of them plus 100 pixels its considered lost.  No
                // points are scored for these enemies though.
                if(tempObject.getX() + tempObject.getBitmap().getWidth() < -100)
                    delFlag = true;
                    
                if(tempObject.getX() > Graphics.getScreenWidth() + 100)
                    delFlag = true;
                    
                if(tempObject.getY() + tempObject.getBitmap().getHeight() < -100)
                    delFlag = true;
                    
                if(tempObject.getY() > Graphics.getScreenHeight() + 100)
                    delFlag = true;            
            }
            
            // If the delete flag is true
            if (delFlag)
            {
                // Remove the object from the vector
                passObjects.removeElementAt(lcv);
                
                // Set our temporary object to null
                tempObject = null;
                
                // If this was our hero object (eg location 0), then we return a -1
                // to communicate this back to our processing routine
                if (lcv == 0)
                {
                    return(-1);
                }
            }
        }
        
        // If our hero is still alive, we return to the number of points scored
        return scoreAdd;
    }
        
    // A quick method simply to ensure screen bound objects don't go off screen.
    // For now this is just our hero, but there may be other objects that function
    // like this.    
    public void boundToScreen()
    {
      // If the coordinates are off screen in any direction, correct the coordinate and
      // set that velocity to 0
      if (_posX < 0)
      {
         _posX = 0;
         _velX = 0;
      }
      
      if (_posY < 0)
      {
          _posY = 0;
          _velY = 0;
      }
      
      if (_posX > Graphics.getScreenWidth() - _bitmap.getWidth())
      {
          _posX = Graphics.getScreenWidth() - _bitmap.getWidth();
          _velX = 0;
      }

      if (_posY > Graphics.getScreenHeight() - _bitmap.getHeight())
      {
          _posY = Graphics.getScreenHeight() - _bitmap.getHeight();
          _velY = 0;
      }
        
    }

}

// Hero object
class Hero extends OBJ
{
   int _lives; // The hero (the player) has multiple lives, different from other objects
   
   Hero(int passX, int passY)
   {
      super(passX, passY);
      
      // Set bitmap to herogame
      _bitmap = Bitmap.getBitmapResource("herogame.png");    
      
      // Set coordinates, velocity, lives, and type identifier
      _velX = 0;
      _velY = 0;
      _life = 5;
      _lives = 2;
      _type = "hero";
   }    
   
   // Hero processing
   public void process()
   {
      // The hero has a max velocity of 10 in any direction
      if (_velX > 10)
        _velX = 10;
      
      if (_velX < -10)
        _velX = -10;
      
      if (_velY > 10)
        _velY = 10;
      
      if (_velY < -10)
        _velY = -10;
        
      // Movement is simply adding velocity to position  
      _posX += _velX;
      _posY += _velY;  

      // If the current life of the hero is less than 1, we check the state of hero
      if (_life < 1)
      {
        
        // If the hero is currently in a normal state, it is put into a dying state
        if (_state == STATE_NORMAL)
        {
            // Set hero bitmap to an explosion
            _bitmap = Bitmap.getBitmapResource("explosiongame.png");    
            
            // Set state to dying
            _state = STATE_DYING;
            
            // Vibrate the phone
            GamePlay.snd.vibrate(180);
        }
        
      }
      
      // If the hero is in an abnormal state (hit or dying), there is additional processing
      // that must happen
      if (_state > STATE_NORMAL)
      {
          // First, we increment the state by 1.  Non normal states are temporary and are checked
          // for terminate by seeing if the initial state value plus a certain number of 
          // refreshes has been reached.  It allows the object to be in a abnormal state for 10 
          // refreshes, 3 refreshes, however many necessary, and then continue onto 
          // some other state, either back to normal or deleted.
          _state++;
          
          // If the ship has been in the hit state for more than 3 refreshes, set it back to normal
          if ((_state > STATE_HIT + 3) && (_state < STATE_DYING))
          {
            _state = STATE_NORMAL;
            _bitmap = Bitmap.getBitmapResource("herogame.png");    
          }
      }
            
      // Bound our hero to the screen
      boundToScreen();
   }
   
   // Our hero's damage method
   public void damage()
   {
      // Decrease life (not lives) by 1
      _life--;
      
      // If life is still above 0, change our hero to the hit state
      if (_life > 0)
      {
        _bitmap = Bitmap.getBitmapResource("herogamehit.png");
        _state = STATE_HIT;
      }
   }
   
   // Our hero's fire method for when it fires a photon
   public void fire(Vector passObjects)
   {
      //Call the parents fire method, with a velocity of -20
      super.fire(passObjects, this, -20);
   }
   
   // Lives setter and getter
   public int getLives() { return _lives; }
   public void setLives(int passLives) { _lives = passLives; }
        
}

// Photon class
class Photon extends OBJ
{
    
    // Initializes like hero object, only has photon.png as a bitmap, and starts
    // with a program specified velocity
    Photon(int passX, int passY, int passVelX, int passVelY, OBJ passParent)
    {
      super(passX, passY);
      _bitmap = Bitmap.getBitmapResource("photon.png");    
      _velX = passVelX;
      _velY = passVelY;
      _type = "firephoton";        
      _parent = passParent;
    }

    // Photon processing is simple, we simply move the object in accordance to its
    // velocity
    public void process()
    {
        
      // Position = Position + Velocity
      _posX += _velX;
      _posY += _velY;  
               
    }


    // When a photon is damaged, it simply dies and disappears instantly.  
    // This is accomplished by setting the state to STATE_DYING + 11.  Since
    // we put objects in the dying state for 10 frames before delition, this
    // immediate deletes it.
    public void damage()
    {
      _life = 0;
      _state = STATE_DYING+11;
    }

}

// Our enemy class
class EnemyDrone extends OBJ
{
   int _AIRoutine; // AI routine stores what kind of enemy this is, normal or kamikaze
   
   // Enemy initialization is like other objects, except we randomly choose what
   // kind of AI routine it should use
   EnemyDrone(int passX, int passY)
   {
      super(passX, passY);
      _bitmap = Bitmap.getBitmapResource("enemygame.png");    
      _value = 50;
      _type = "enemydrone";
      
      // Statistically, 3 out of 5 enemies are normal, 2 are kamikaze
      if (GamePlay.rndGenerator.nextInt() % 10 < 6)
         _AIRoutine = 0;
      else
         _AIRoutine = 1;
         
   }    
   
   // Enemy processing is identical to hero processing, except enemies don't
   // have a hit state, since they have one life (not to be confused with lives), 
   // one hit kills them, hence theres no need for a hit state
   public void process()
   {
      _posX += _velX;
      _posY += _velY;  
      
      if (_life < 1)
      {
        if (_state == STATE_NORMAL)
        {
            _bitmap = Bitmap.getBitmapResource("explosiongame.png");    
            _state = STATE_DYING;
            GamePlay.snd.vibrate(180);            
        }
       
        _state++;
      }
      
   }
   
   // The think method is where the individual enemy AI takes place
   public void think(Vector passObjects)
   {
    
      // If they've blown up, they can no longer think
      if (_life < 1)
         return;
      
      // We start off with a velocity of 0 in both directions
      _velX = 0;
      _velY = 0;
      
      // Grab a handle on the hero object so we know how to direct our enemies
      Hero tempHero = (Hero) passObjects.elementAt(0);
      
      // If we're in normal AI mode
      if (_AIRoutine == 0)
      {
        // If hero is to our right, set velocity to right
        if (_posX + _bitmap.getWidth() / 2 < tempHero.getX() + tempHero.getBitmap().getWidth()/2)
            _velX = 5;
                    
        // If hero is to our left, set velocity to our left
        if (_posX + _bitmap.getWidth() / 2 > tempHero.getX() + tempHero.getBitmap().getWidth()/2)
            _velX = -5;
        
        // Enemies try to stay 40 pixels above hero    
        if (_posY + _bitmap.getHeight()  < tempHero.getY() - 40)
            _velY = 5;
                    
        // If enemy is below hero, they move up            
        if (_posY > tempHero.getY() + tempHero.getBitmap().getHeight())
            _velY = -5;
            
        // Add a little bit of random movement in
        _velX += GamePlay.rndGenerator.nextInt() % 4 - 2;
        _velY += GamePlay.rndGenerator.nextInt() % 4 - 2;
        
        // Random firing, fire 1 in 7 times thinking
        if (GamePlay.rndGenerator.nextInt() % 4 == 1)
        {
            fire(passObjects);
        }
     }
     else
     {         
        // Kamikaze AI is the same for as above for horizontal processing.  
        if (_posX + _bitmap.getWidth() / 2 < tempHero.getX() + tempHero.getBitmap().getWidth()/2)
            _velX = 5;
                    
        if (_posX + _bitmap.getWidth() / 2 > tempHero.getX() + tempHero.getBitmap().getWidth()/2)
            _velX = -5;
      
        // For vertical though, the enemy drone is always going downward at a faster rate
        _velY = 8;   
     }
   }

   // If enemy is damaged, their life is decreased
   public void damage()
   {
     _life--;
   }

   // An enemy firing calls the Object's fire method with a downward direction
   public void fire(Vector passObjects)
   {
      super.fire(passObjects, this, 20);
   }

}

Now that we have our Gameplay and OBJ defined, we’ve taken care of pretty much all of our game logic. Now all that’s left is the code to drive our graphics and sound processing. These classes are called, aptly, GFX and SND!

Onto GFX in part 5…

Creating a Blackberry Game – Part 3

Looking for part 2?

Gameplay

Now that our initial menu switches control to the Gameplay class (by putting an instance of it on the screen stack – [gameplay extends FullScreen]), we need to actually define it! Gameplay takes care of high level game functionality by multitasking actions via threads.

One thread, “Refresher”, takes care of creating new objects, looping through existing objects and telling them to process themselves, then checks for collision detection, adds points gained to total score, tells the graphics engine to redraw the screen, etc. It is basically the primary heartbeat loop that ensures everything keeps updating properly.

The other thread is the EnemyAI thread, which is responsible for looping through all the objects and telling enemies to run their intelligence processing, which sets their movement and firing.

Please note – this is one of the areas where the Blackberry emulator seemed to differ from the real thing. On the emulator, thread processing would simply halt if no key was being pressed, while on the Blackberry it would have no issues. While this might be a fault of mine, it doesn’t change the fact that the emulator acted very much differently than the real thing.

Lastly, gameplay has keychar and navigationMovement overridden to process when the Escape or Spacebar is pressed, as well as when the trackball is moved.

GamePlay.java

package com.synthdreams.GalacticBlast;

import net.rim.device.api.ui.UiApplication;
import net.rim.device.api.ui.container.FullScreen;
import net.rim.device.api.ui.Graphics;
import net.rim.device.api.system.Characters;
import net.rim.device.api.system.Application;
import java.lang.Thread;
import java.lang.Math;
import java.util.*;

// Gameplay extends FullScreen only, it doesn't need the functionality of the
// MainScreen object.  Either are screens though, and can be pushed onto the 
// screen stack
// Special Note: For those familiar with the concept double buffering, supposedly
// the rim UI automatically does this.  It seems to from what I can see, I
// notice no tearing or graphic anomalies.
// For those unfamiliar, if you blit (write) graphic data directly primary graphic
// buffer, it is out of sync with the refresh of the screen.  This can cause
// tearing or other weird graphic issues, as half of the screen is still being shown
// where the objects were, and the other half where the objects are now.  This
// is solved by first drawing to a back buffer, and then flipping the entire
// back buffer with the front during the screen's refresh.  In java there are
// specific game-oriented screen classes to do this, but supposedly the RIM
// libs do this automatically. 
public class GamePlay extends FullScreen
{
    // These three objects are called from many places and are made public
    public static GFX gfx;  // Static object for graphics control
    public static SND snd;  // Static object for sound control
    public static Random rndGenerator; // Static object for random numbers
    
    Refresher _refresher;  // Thread that continually refreshes the game
    EnemyAI _enemyai; // Thread when the enemies think
    Vector _objects; // A vector of all objects currently in play
    
    boolean _active; // Flag if our game is currently active or not (eg did we lose)
    int _score; // Player's current score
    
    // Getters for active and score
    boolean getActive() { return _active; }
    int getScore() {return _score; }
    
    // Refresh is a type of thread that runs to refresh the game.  
    // Its job is to make sure all the processing is called for each object, update the background,
    // update score, check for end of game, etc.  This is the main heartbeat.
    private class Refresher extends Thread
    {
        // When the object is created it starts itself as a thread
        Refresher()
        { 
           start();
        }
        
        // This method defines what this thread does every time it runs.
        public void run()
        {
            // Temporary variable that stores the score value of all
            // the objects that were just cleaned (destroyed/removed)
            // return a negative number if we died
            int cleanReturn;
            
            // This thread runs while the game is active
            while (_active)
            {
                
                // Level population/processing, responsible for creating new enemies
                processLevel();
                
                // Perform physics by calling each object's process command.  Objects
                // are unique and control their own physics (e.g. a photon blast can move
                // faster than our hero ship), so we loop through all our objects
                // and call the process method on each.
                for (int lcv = 0 ; lcv < _objects.size() ; lcv++)
                {
                    ((OBJ) _objects.elementAt(lcv)).process();
                }
                
                // Collision detection of objects.  If they collide, this method
                // will call the damage method of each object, which might lead
                // to no life for the object
                OBJ.collisionDetect(_objects);
                
                // Clean up stuff that's gone (e.g. life of 0 and in 
                // destroyable state, eg explosion graphic), quit if we were destroyed
                cleanReturn = OBJ.cleanObjects(_objects);
                
                // If we didn't die, add the score, redraw, etc.
                if (cleanReturn >= 0)
                {
                   _score += cleanReturn;
                   
                   // Now that all our processing is done, tell the graphics engine to 
                   // redraw the screen through a call to invalidate (invalidates the screen
                   // and automatically causes a redraw)
                   invalidate();
                }
                else
                {
                   // if we died, mark active as false.
                   _active = false;    
                }
                   
                try
                {
                    // Attempt to sleep for 50 ms
                    this.sleep(50);
                        
                }
                catch (InterruptedException e)
                {
                    // Do nothing if we couldn't sleep, we don't care about exactly perfect
                    // timing.
                }
            }
        }
                
    }

    // We have a separate thread that takes care of enemy AI.  This allows us to control how
    // quickly the enemies think outside of our main refresh thread.  That way we can make
    // dumb enemies that think much slower than the action happening around them, or smart
    // enemies that think as fast.
    private class EnemyAI extends Thread
    {
        EnemyAI()
        { 
           start();
           
        }
        
        public void run()
        {
            // Just make sure the thread doesn't accidentally run when the game is over
            while (_active)
            {
                // Loop through all the objects and call the think method, which
                // controls the actions of that object.  Technically, this call's
                // the hero's think method as well, but Hero doesn't have the
                // think method overridden from the parent's, which is just blank,
                // so the hero does no automatic thinking.
                for (int lcv = 0 ; lcv < _objects.size() ; lcv++)
                {
                    if (_active)
                        ((OBJ) _objects.elementAt(lcv)).think(_objects);
                }
                
                try
                {
                    // Enemies think 5 times a second
                    this.sleep(1000/5);
                        
                }
                catch (InterruptedException e)
                {
                    // Do nothing, again we don't care if timing isn't exact
                }
            }

        }
        
    }

    public GamePlay()
    {
        snd = new SND(); // Create sound engine
        gfx = new GFX(); // Create graphics engine
    
        rndGenerator = new Random(); // Create random number generator

        _active = true; // Mark the game as active
        _score = 0; // Start with a score of 0

        // Set our background to stars.png with a speed of 3 pixels per refresh
        gfx.initBackground("stars.jpg", 3);

        // Start our music playing.  Something odd I noticed with my Blackberry 8830,
        // which may either be a bug or some functionality I'm missing from the
        // sound routines, is the volume starts out very quiet the first time you
        // start playing. If you stop the music playing and play it again, the volume
        // is fine.  This might not be true for all Blackberrys, but it doesn't hurt
        // anything to start, stop, and start again, so that's what we've done here,
        // just to solve the volume bug/misundertsanding.
        snd.playMusic("music.mid");
        snd.stopMusic();
        snd.playMusic("music.mid");

        // Create a new vector to hold all the active objects (hero, enemies, photons, etc)
        _objects = new Vector();
        
        // Our hero will always be the very first object in the vector.
        _objects.addElement(new Hero(Graphics.getScreenWidth() / 2, Graphics.getScreenHeight() - 50));
        
        // Create the refresher and enemy AI last, we want to make sure all our objects are setup first
        // so the threads don't make use of uninitialized objects
        _refresher = new Refresher();        
        _enemyai = new EnemyAI();
       
    }
  
    // Process level is responsible for new computer generated events in the game.  In our
    // case, the only one really is creating new enemies.  
    public void processLevel()
    {
        OBJ tempObject;
        
        // Throw a new enemy in every 25 pixels.  This can be made more complex if desired
        // of course
        if (gfx.getBackPos() % 25 == 0)
        {
            // Create a new enemy drone with the X coordinate somewhere between the two edges of the
            // screen
            tempObject = new EnemyDrone(rndGenerator.nextInt() % Graphics.getScreenWidth(), 0);
            
            // Set the Y coordinate to above the screen, so it comes in from the top
            tempObject.setY(tempObject.getY() - tempObject.getBitmap().getHeight() + 3);
            
            // Add the enemy to the object vector
            _objects.addElement(tempObject);    
        }
    }
 
    // This method is called when the invalidate method is called from the refresh thread.
    // We have it passing the graphics object over to our graphics engine so our
    // custom graphics routines can take care of any drawing necessary.
    protected void paint(Graphics graphics)
    { 
       gfx.process(graphics, _objects, _score, ((Hero)_objects.elementAt(0)).getLives()); 
    }
    
    // The keyChar method is called by the event handler when a key is pressed.  
    public boolean keyChar(char key, int status, int time) 
    {
        
        boolean retVal = false;
        
        switch (key)
        {
            // If escape is pressed, we set the game to inactive (quit)
            case Characters.ESCAPE:
                _active = false;
                retVal = true;
                break;
                
            // If the spacebar is pressed, we call the fire method of our
            // hero object, causing him to fire a photon
            case Characters.SPACE:
                ((Hero)_objects.elementAt(0)).fire(_objects);

                retVal = true;
                break;
            
            default:
               break;
        }
                 
        return retVal;
    }
    
    // The navigationMovement method is called by the event handler when the trackball is used. 
    protected boolean navigationMovement(int dx, int dy, int status, int time)
    {
        // If the trackball was scrolled in the horizontal direction, we add that amount to
        // our hero's X velocity
        if (dx != 0)
            ((OBJ)_objects.elementAt(0)).setVelX(dx/Math.abs(dx)*5+((OBJ)_objects.elementAt(0)).getVelX());

        // If the trackball was scrolled in the vertical direction, we add that amount to
        // our hero's Y velocity            
        if (dy != 0)
            ((OBJ)_objects.elementAt(0)).setVelY(dy/Math.abs(dy)*5+((OBJ)_objects.elementAt(0)).getVelY());
            
        return true;
    }
    
}

Gameplay together with the OBJ set of classes is the heart of the logic of our game. Gameplay represents the manager, the high level control that directs actions, while the OBJ classes do the nitty gritty work of processing for each object (objects being things like the hero, the enemies, and photons). Now that we’ve seen Gameplay, lets take a look at OBJ (objects).

Onto the objects in part 4…