Category Archives: Other

Shredz64 and PSX64 Updates

Due to quite a bit of interest and positive support, I’ve tried to kick my butt back in gear and start producing more PSX64 boards, as well as update Shredz64 a bit. We’ve been popping up in a few expos and meetups, including TNMOC’s Vintage Computer Festival 2010 at Bletchley Park, VCF East, SC3 Arcade Party, and most recently at the Commodore Computer Club.

It means a lot that people are still very interested in this work, so I’ve started by making the following updates:

  1. Updated the PSX64 firmware to fix a bug in macro recording, tighten up the analog joystick response, and increase sensitivity for precision game play when a non-Guitar controller is plugged in.
  2. Updated the Shredz64 webpage with a downloadable bonus track, the Stairway to Heaven Intro, by Nantco Bakker. This track appeared on very early versions of Shredz64, but was replaced with Edwin’s Dream. Now both tracks can be enjoyed.
  3. Since shipping varies wildly, and I tend to make boards as the need arises, I replaced the Paypal button on the order page with a link to the contact page. If you’re interested in ordering a PSX64, simply contact me with your shipping address, and I’ll quote you out the total price.

Thanks for your support everyone!

Best Modern Practices – Cisco MDS 9000 (Fibre Channel) – Part 2

Back to Part 1…

Use Your MDS to Its Full Potential!

If you’ve taken some time looking through all the thousands of things NX-OS and Fabric Manager can do, you’ll know that the MDS line is amazingly powerful. I’m totally a CLI guy, and I do most of the basic switch configuration in NX-OS, but don’t hesitate to the abuse the hell out of Fabric Manager – it’s a fantastic tool for getting a visual representation of your Fibre Channel infrastructure. And, it gives you a quick visual (both in a textual list and graphical layout) into exactly what device is plugged into what port.

Example FabricManger Layout

Perhaps older switches couldn’t report what device was attached to what port, but if there is no pragmatic need for port zoning, then I believe it shouldn’t be used, as it is NOT aligned to the purpose of zoning. The conceptual purpose of a zone is to define security at the device level – i.e. what device can talk to what device. The purpose is not to be a mechanism for port security. Port security exists at a lower level (or more appropriately, layer, if we think in terms of an OSI-esque model), and should be handled separately and independently.

port-security ENABLE!

The engineers at Cisco are pretty smart people, and they understood the need for port security in a WWN zoning environment. They understood that we, the administrators, deserve the best of BOTH worlds, and they gave it to us. Not only can you configure what WWNs are authorized to be on what physical ports with port-security, but you can also have the MDS automatically learn what devices are currently connected, and set them up as authorized WWNs, expire them, auto-learn new devices, etc.

What does this mean? Quite a bit. We get the ease (and conceptual correctness) of managing zone membership by WWN, MUCH easier migrations, an instant snapshot of exactly what device is connected to what port, and the security of Cisco’s standard port-security mechanism. Maybe I’m crazy (okay, I’m pretty sure I am), but I’m a firm believer that WWN zoning is completely the way to go.

Device Aliases Rule, FC Aliases Drool

A key to making Fabric Manager work the best for you (especially if you’re dealing with a pure Cisco fabric), is to make heavy use of Device Aliases and say goodbye to FC aliases. There are a number of reasons for this, but mostly center around the fact that Device Aliases can be used in most sections of the MDS configuration where pWWNs are used, whereas FC aliases are pretty much per vsan and for zone membership only. Not only does this make configuration easier, but Fabric Manager makes heavy use of the device alias (remember above when we were talking about having Fabric Manager show you what devices are connected to what physical ports? Device Aliases make this work, as then you get a nice readable name instead of a pWWN). Additionally, for you CLI guys and gals, anywhere in the config that a pWWN with a Device Alias is mentioned, NX-OS prints the Device Alias right below it, which is extremely helpful while trudging through lines and lines of WWNs.

You may be stuck with FC Aliases if you have a hybrid switch environment with something other than Ciscos, but otherwise, it’s time to ditch FC Aliases.

Single Initiator, Single Target Zoning

It’s a little more work than making big easy zones with lots of members – but it’s honestly the safest and most technically efficient method of zone operation. There are some times when it becomes necessary to include multiple initiators/targets in failover clusters or other special cases, but other wise – make your zones 1 to 1. This ensures that there is no extra traffic in the zone, protects your other zones in the event that one of your HBAs malfunctions – and safe guards your remaining connections from a server to other SANs should you screw up the configuration in one of the zones. It’s extra work, but it’s worth it.

Feedback!

Most of these are based off of best practices gleaned from Cisco, VMware, and Compellent – but as mentioned, there are debates out there surrounding many of them. Please feel free to share your Fibre Channel thoughts or experiences, I think this is definitely an area that deserves more attention.

Best Modern Practices – Cisco MDS 9000 (Fibre Channel) – Part 1

We recently got a pair of shiny new Compellent SANs at work – both a primary and DR setup which replicate to each other. Seriously awesome stuff (Sales pitch mode – I don’t work for Compellent, but they make an amazing product, and Data Progression in the bomb. Check them out if your organization is in the market).

Part of the migration and installation process included switching out our old Cisco 9020 Fibre Channel switches for 9124s, as the 9020s do not support NPIV. If you’ve ever had to replace your entire Fibre Channel infrastructure, you’ll know it can be kind of a bear, depending on the size. However, it does present a rare opportunity to make some major reconfigurations and restructuring. For us, our previous zoning setup was a little funky and needed to be tightened up a bit, so this was the perfect time.

A Little Knowledge Can Be a Dangerous Thing

One of my issues going into this situation was my lack of fibre channel knowledge. I understood the basic premise behind zoning, but I had never done major switch configuration, and had always relied on the storage vendor in question to help out. While Compellent was very helpful during the install, I knew I wouldn’t find any better opportunity to drive full on into Fibre Channel joy and learn everything I could. And I definitely came away with some interesting tidbits.

Zoning Semantics

There are many FC related debates, but one stems around Hard vs Soft zones and Port vs WWN zones. Unfortunately, a lot of the confusion stems around the fact that people mistakenly interchange the zoning phrases hard for port, and soft for WWN. This is incorrect – port zoning is not the same thing as hard zoning, and WWN zoning is not the same as soft zoning! I have seen a few theories on why people have treated them interchangeably over the years: Some older switches matched the two functionalities together (e.g. you could only port zone through hardware, and WWN zone through software), or people just hear the word “hardware” and automatically think “physical port”, or people just learned it that way, etc.

In truth, hard zoning simply means that the segmentation is enforced in ASIC hardware, and there is absolutely no way for out-of-zone traffic to occur. Soft zoning is security performed in software by consulting the name server on the director – and is not as secure as hard zoning – if an initiator knows (or guesses) the target WWN, they can communicate with it, the switch hardware doesn’t prevent the packet from reaching the destination, even though the initiator doesn’t share a zone with it. For example, if Google wanted to hide their website by deleting their domain name “google.com”, I could still get there if I knew their IP address. It’s not very difficult to brute WWNs – like MAC addresses, they are assigned by vendor, and are most likely produced sequentially. Lookup the vendor prefix, and you’re already half way there. For this reason, hard zoning should always be used, regardless if port or WWN zoning are used.

Port vs WWN, Round 1, FIGHT

Now that we’re using the correctly terminology, the heart of the debate is whether one should use port or WWN based zoning. In port based routing, the physical port itself is a zone member. Any device plugged into it will be in the zone. Move a device to a different port, and it is no longer in that zone. In WWN based zoning, the WWN of the device is a zone member. For this reason, no matter what port you plug the device into, it will be in the zone.

Both have pros and cons:

Port Based: PRO – security is tighter. WWNs are easily spoofed, but an intruder would need to physically unplug the current device from the physical port and plug a new one in to jump onto the zone – which would be noticed for a number of reasons. CON – you need to keep track of what physical ports each device is plugged into. If you ever replace your switches, this means a lot more work.

WWN Based: PRO – since zone membership is recognized by WWN, it doesn’t matter what port the device is plugged into, which means less headache trying to keep track of what is plugged into what port (especially during an install/migration). CON – less secure, as WWNs can be spoofed, as mentioned above.

Now – I’ve read a number of articles that say WWN based zoning is unmanageable because you don’t know what device is plugged into what port, and the security is bad because WWNs are spoofable, no respecting storage administrator would ever use WWN zoning, it’s lazy, evil, unpatriotic, etc. What I say to this: POPPYCOCK!

Why Did Toni Just Say POPPYCOCK!? Find out in Part 2…

Website News – WordPress Update

I took an hour out last night and upgraded the site to WordPress 3.0. While outward appearance wise, nothing much should change, the admin interface is drastically different (and improved). If you’re running your own WordPress site and haven’t made the jump to 3.0 yet, don’t hesitate – it’s worth it.

Where No Game Has Gone Before: Star Trek Online

Amazingly enough, I am a Star Trek fan (hard to believe, I know). When I was little, I would watch the original movies and cartoon series (I don’t think the original series was really airing anywhere where I was), and then once Star Trek: The Next Generation came out, I was completely hooked. TNG was the pinnacle for me – I watched DS9 and Voyager as well, but not to the religious degree that I followed the adventures of NCC-1701-D. As each series was canceled, I’d watch the movies when they came out (the new reboot was fantastic) – but there is definitely a piece of me that missed not having Star Trek regularly in my life. That is why I was so excited for the prospect of Trek’s newest game, Star Trek Online.

MMORPG: The Next Generation

There have been numerous games to use the Star Trek IP in the past. What makes Star Trek Online different is its venture into the massively multiplayer world. Developed by Cryptic Studios (Champions Online), STO allows each player to captain their own starship in the Star Trek universe. This also includes getting to role play as one of the many races in Trek, such as Andorians, Trill, Vulcans, Klingons, etc (the list goes on quite a bit). From fast-paced space battles to a slew of away team missions, Cryptic has attempted to convert the full experience into a cooperative (and head-to-head) online environment. But did they succeed?

The Good

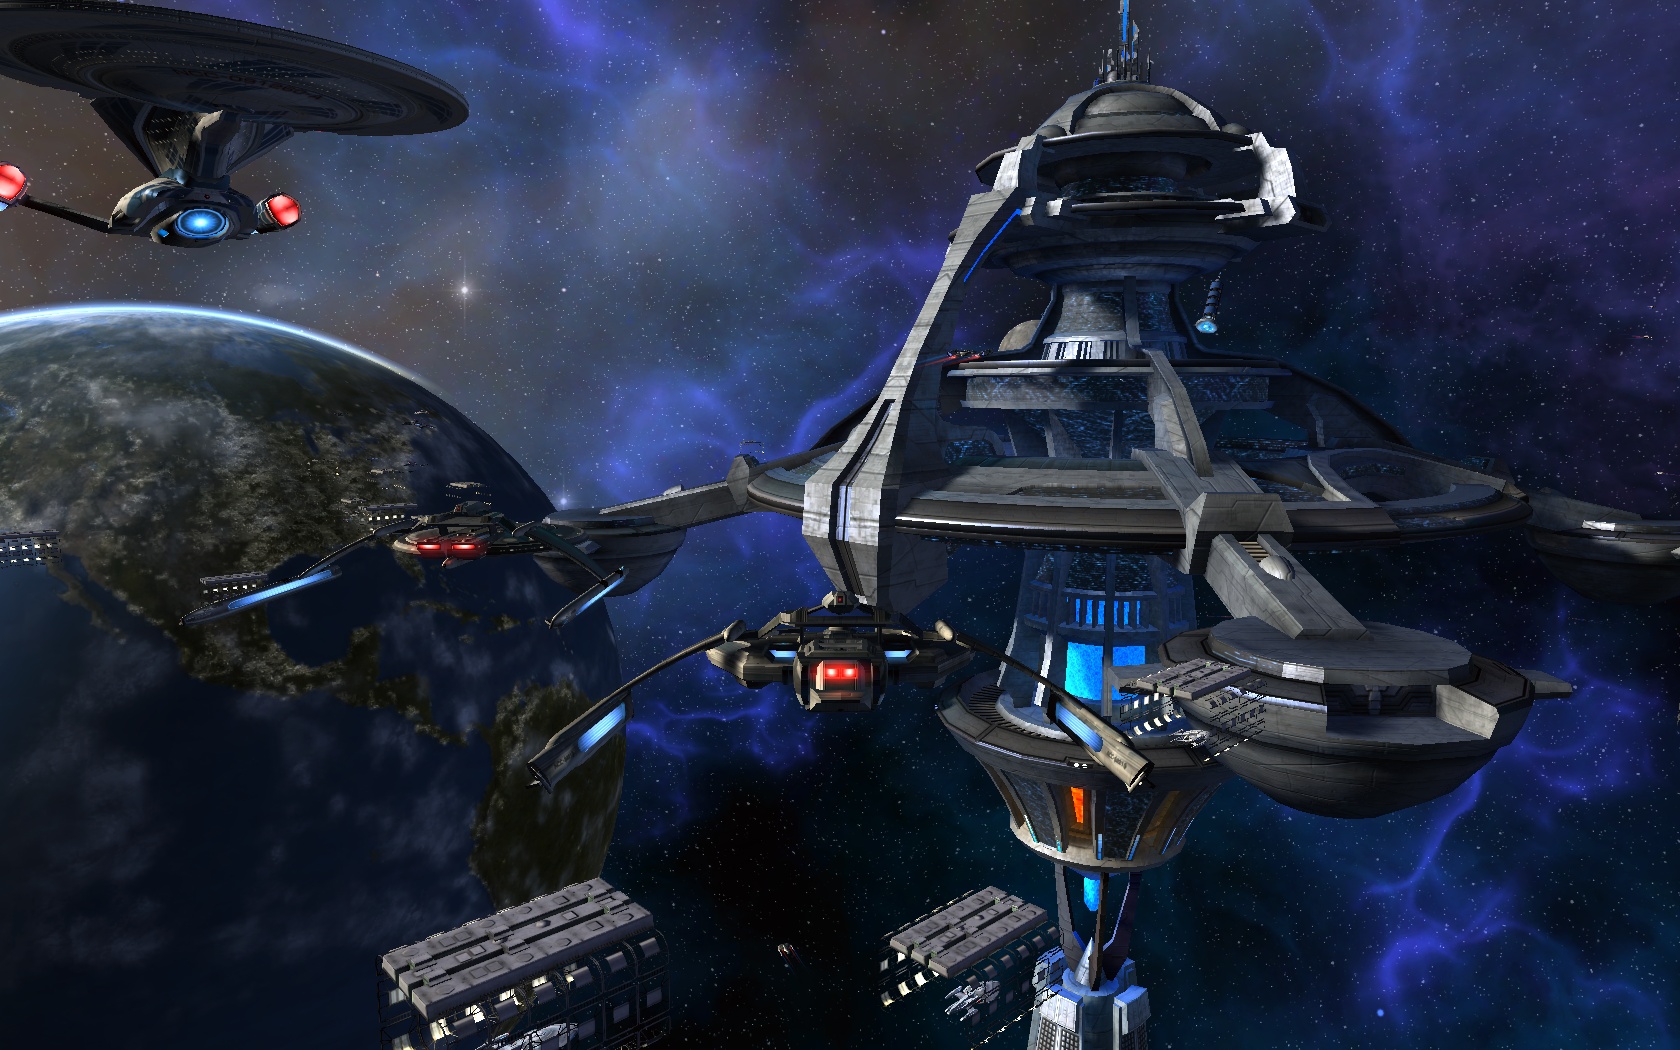
One of the first things you’ll notice when you start playing is how gorgeous the game is, especially in space. The development crew did a fantastic job with the recreating a wide variety of astronomical phenomena, making the game a real eye pleaser. I constantly find myself taking screenshot after screenshot as I encounter amazing looking locations.

Star Trek Online Battle
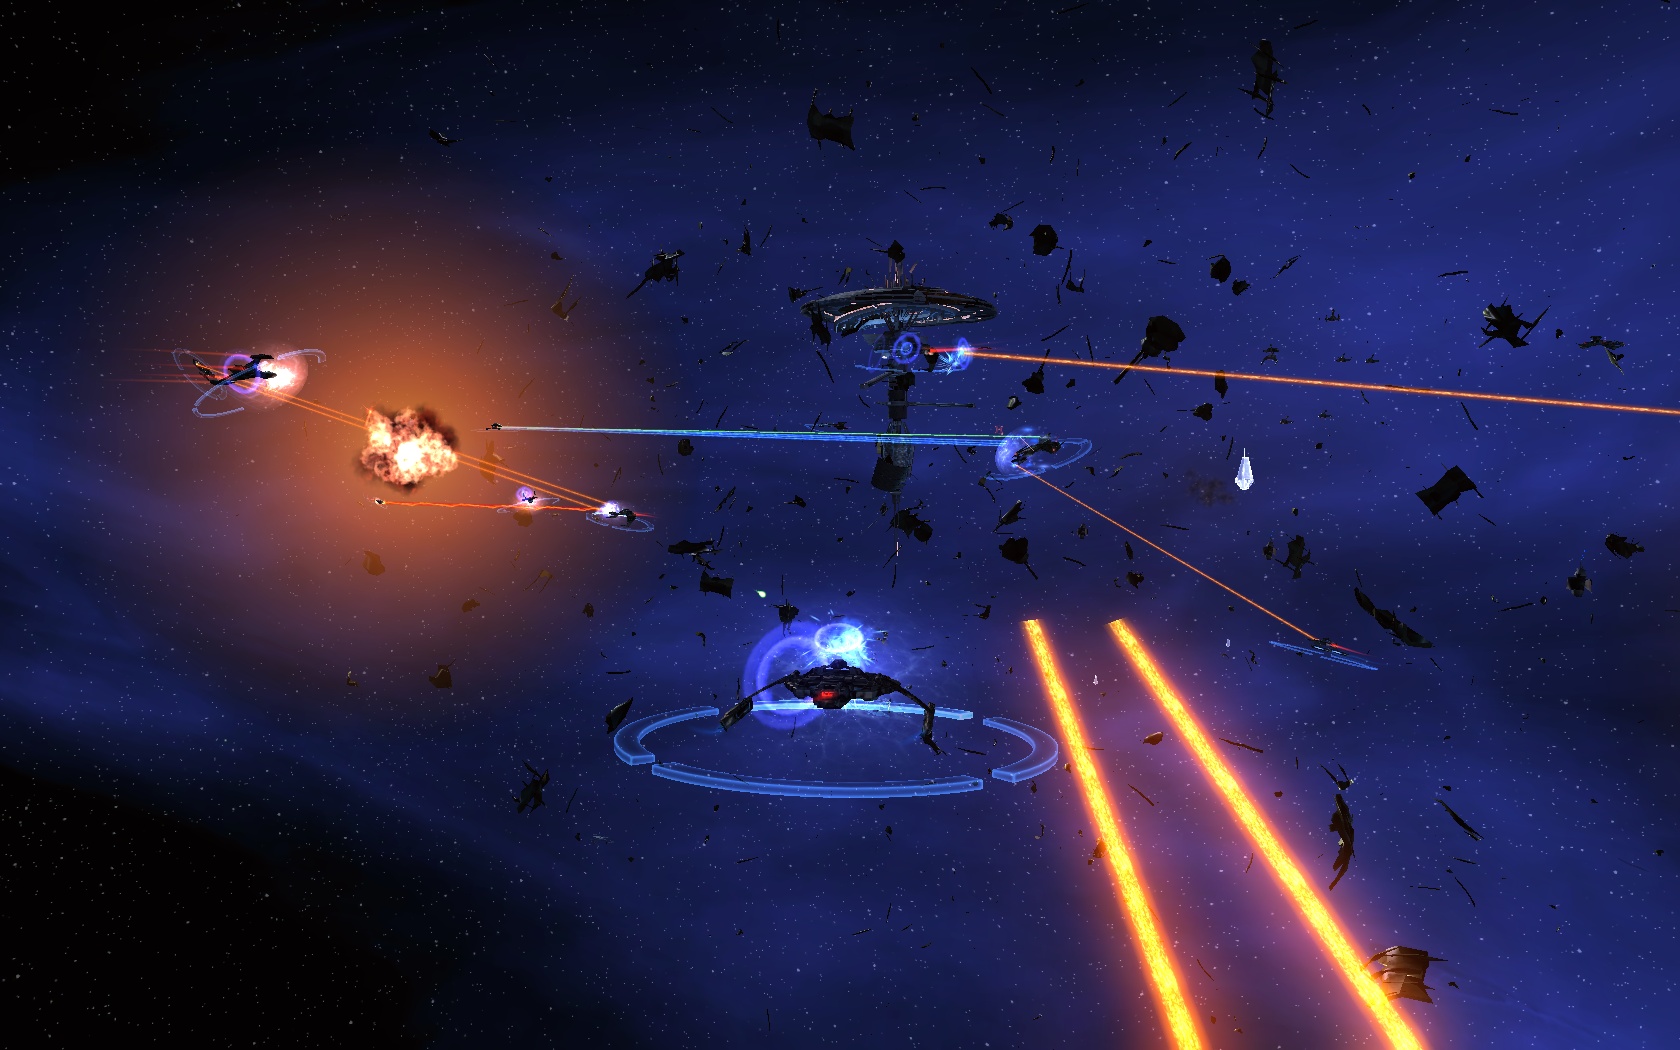
For me, while fighting on away missions can be enjoyable, the dogfights in space are where the real fun is. By tailoring your and your bridge crew’s abilities, as well as modifying your starship with just the right armaments, you can create thousands of strategies for battle, customizing everything to your style of play. Specialize in engineering with a bridge crew trained for weapons modification and overpower the enemy, or become a science officer with a bridge crew trained for trapping and weakening your opponent, the sky (or space) is the limit.

The list goes on for where Cryptic got it right, but at the heart of it, I feel like they really captured Gene Roddenberry’s universe. All the major locations that will be familiar to any fan are present (Earth Spacedock, DS9, Memory Alpha, all the home planets). Each mission has details and back history to go along with the tasks at hand – which is highly suggest reading. You can blow through character dialog and just play for the action, but getting fully into what’s going on really adds to the immersion factor.

Star Trek Online Spacedock

The Bad

For me, STO took a while to get into. After I did, I was completed addicted, but for the first 5 hours or so, I was playing more because it was a Star Trek game and I really wanted to give it a fair chance. They scale back the difficult to start, so it almost feels like you can’t die, which also made me question how fun the game was going to be.

Star Trek Online Away
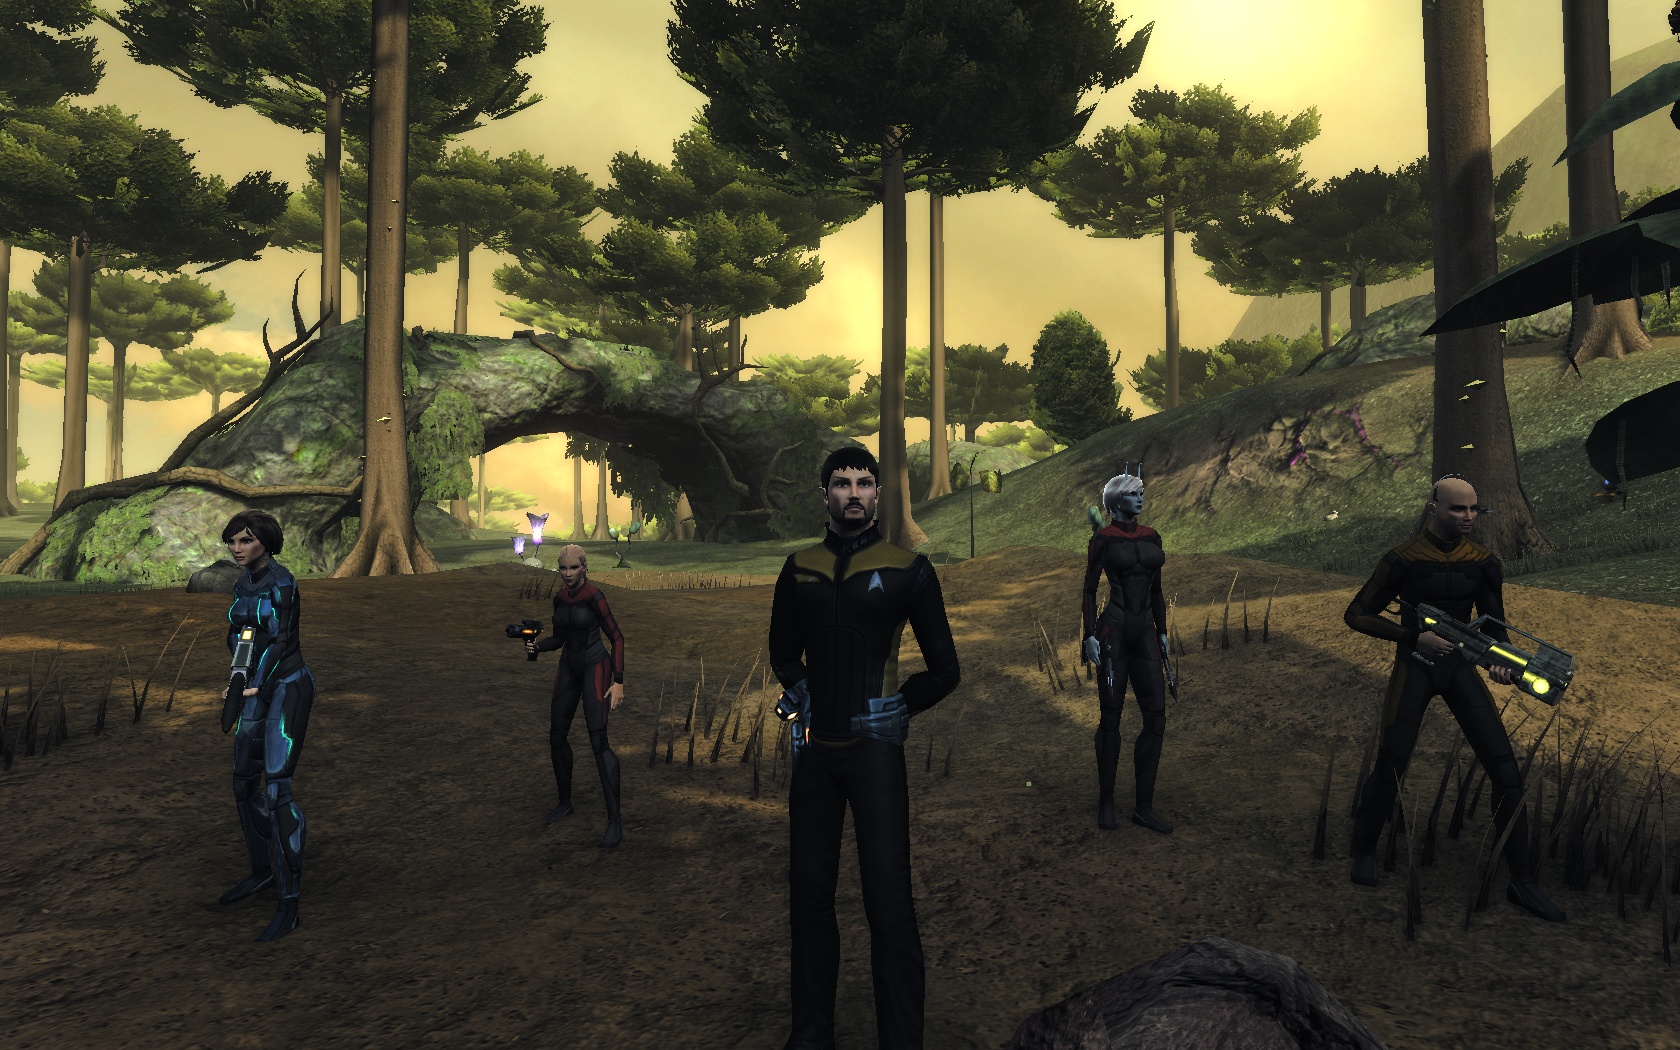
Additionally, I wasn’t a fan of the away missions (and still have some reservations about the style of play, though I’m getting used to it). It’s a 3rd person view of your team, but actions are assigned as opposed to FPS style. You tell your character what action to take (shoot this enemy, create a shield generator, plant a bomb), but you don’t control how he shoots (e.g. a FPS). This makes ground combat also very strategy oriented as opposed to shoot-em-up. This still makes for an enjoyable and cerebral battle, but I almost feel like it would have been a better balance by keeping the strategy to space battles, and adding more fast-paced fun to away missions. Additionally, the AI for your bridge officers, while mostly good, can be atrocious sometimes, especially in the heat of battle when you don’t have a chance to manually configure their actions.

The last major issue I see with the game is a lack of a community feel – it almost doesn’t feel like an MMORPG, more like a single player game where you occasionally team up with shipmates for space battles. I think this is due less to any shortcoming of design and more to the confines of doing a Star Trek MMO, in which there are thousands of planets separated by long space flights, as opposed to your typical MMO where you’ll constantly see everyone running around in a relatively small area with battles nearby and on the way to your destination. This almost isn’t that big of an issue with me, as I’m less of a social MMO player, which is why I never got too heavily into WoW – but I think for many people it will be an issue.

The Ugly

There are few major issues with this game, but being hot off the grill, it does have its slew of bugs that are being handled as they come up. I’ve found my ship trapped inside objects on a few occasions, to the point where I can’t move. I’ve also had strange UI issues, not being able to cleanly exit an area, mission issues, etc. But like I said, the game is brand new, and like any MMO, will take a while to refine. In addition, as time goes on, Cryptic will add more and more content, which I’m looking forward to as well.

Get Ready to Boldly Go

So whether you’re a Star Trek fan like me, or looking for a new MMORPG experience (or both! It’s not surprising many Star Trek fans are also video game players), give STO a try. With multiple pricing plans (monthly, yearly, lifetime, etc), you can give it a whirl for a while, and then make a bigger commitment if you find yourself hooked. Check it out at the official website: www.startrekonline.com.

Ping Failover Daemon for Linux

Overview

I wanted to make available a GPL daemon I developed for Linux called the “ping failover daemon”, or pfailover. It is designed for hosts with two or more network interfaces, with the goal of rerouting traffic over the secondary interface when the primary fails. It achieves this by monitoring a host over the primary connection via ping, and changing the route tables when it doesn’t receive a response. In this way, it is smart enough to reroute if any hop along the way fails, as opposed to rerouting only under the circumstances of a link-loss. When it starts receiving responses to the host over the primary interface again, it restores the route tables, thereby activating the primary connection again.

The daemon also runs scripts whenever a connection is changed, so you can insert any functionality you want, such as sending out a warning email to the IT team saying something’s up.

Additionally, it allows you to setup as many monitors as you’d like, if you have complex setups with 3 or more network interfaces, or reroute in a different fashion depending on which monitored host goes down.

For programmers and scripters, it also allows full monitoring and control via the command line and shared memory, allowing other programs to integrate its functionality.

The Reason for Development

A few months back, we ran into an interesting situation at work. We had only had T1s for an Internet connection for the longest time, but we decided since broadband was so cheap for the bandwidth, we would also get a cable modem – mainly to be used for staff web traffic. At the same time, it was a great opportunity to setup a proxy server as the gateway to this new, speedy connection. Not only would this give us an additional speed boost due to caching, but would also allow us to do some management over web use.

As anyone with a cable modem knows (well, at least with Comcast) – connection loss and downtime are not questions of if, but rather when – and when I say “when”, I really mean how many times a week. Which is fine – there is a reason why organizations still go with T-carriers and not just broadband connections – they’re more expensive, but more reliable as well.

Anyway, with this in mind, we knew that it was just a matter of time before the proxy server lost its connection to the Internet via the cable modem, and staff would start complaining about Internet loss. And at the airport, uptime is a big deal, which is especially difficult being a 24×7 operation. While there are a few strategies on how to handle this, I decided I wanted a simple solution – the proxy server would simply reroute its web requests back out the internal network connection to the T1s, instead of to the cable modem connection. Then when the cable modem came back online, it would start routing back out that interface again.

I found some other packages to do this, but they were all very robust, complex, and just too big for what I wanted – I wanted a lightweight daemon with scripting ability, so I could start out simple, and grow it complex if necessary. So I decided it would be a fun project to code one up in C++ – I rarely get to write any C++ code anymore, so I take the opportunity when I can.

Installation and Usage

You will need the lastest version of the boost libraries to compile pfailover. The installer includes sample conf and script files to aid in setup – plus it’s fairly straightforward and should only take a few minutes to configure. You can see all the options by typing “pfailover –help”. Normally, after configuring it, you’ll want to run it as a daemon with the “pfailover -d” command. Once running, you can check the current status at any time by typing “pfailover -s=get:0”.

Download pfailover 0.4.1

How to Move the COS (esxconsole.vmdk) in VMware ESX 4 (vSphere)

We recently upgraded from ESX 3.5 to vSphere at work, and man – is it awesome. The infrastructure manager (vSphere Client) supports a whole boatload of new options for better monitoring and managing your VMs and clusters – including a patch management system for keeping your VMs and hosts up to date. If you’d like the full details of all the new features, check out the VMware page here.

The Console OS

One new aspect of vSphere is it separates out the hypervisor from the service console to a greater degree, actually creating a VM for the console. Great from an architectural point of view – however, one gotcha is where it actually STORES this VM. During the upgrade (and I’m assuming new install process), it asks where you’d like to store this Console OS VM. It suggests you store it on local storage, but you can just as easily store it in a Datastore on your SAN. Which is what I (and others judging from the web) chose as an option.

An issue arises in that there is no easy way (that I know of, after scouring the web for ages) to move the console VM in the future. We recently needed to redo all the LUNs on our SANs, which meant we needed them empty – which is when we ran into this issue. The service console was on the SAN with no good way to move it.

The Solution

First off – proceed at your own risk. [UPDATE] When asking VMware support about this solution, they said it works, but is not officially supported. [END UPDATE] So far we’ve had no issues, but that’s not to say in 2 months our whole ESX cluster won’t detonate, showering death and destruction down on us. That being said, I think we’re pretty safe.

This question has been asked before, and everyone on the VMware forums said you needed to reinstall your ESX server to move the console VM – this is the official stance by VMware as well. I originally decided to do a little digging though, as it just seemed like there must be some way of doing it. It was just a file that needed to be moved, and the underlying OS is Linux, so I guessed it was all being done through scripts. I was right.

If you take a look at /etc/vmware/esx.conf on your ESX host in question, you’ll see all your configuration options. One of which is

/boot/cosvmdk

This points to the path and filename of the service console. This value is later used by the initialization script “/etc/vmware/init/init.d/66.vsd-mount” to mount the service console. We can change this value to anything we want, inclung a new location.

  1. Identify the correct service console VM for the ESX server in question. This isn’t an issue if you’ve got 1 ESX server, but if you’ve got a cluster, it’s not always clear the one in question. The console VM is stored with the name “esxconsole-<uuid>”. You can find the unique identifier/cos vmdk filename for your server within the /etc/vmware/esx.conf file.
  2. Identify the Datastore where you want to keep the service console. Take VMware’s advice and keep it on local storage – that way, if your SAN dies or you need to do maintenance, you aren’t in a pickle. Look in /vmfs/volumes and write down the ID of the storage you want to use.
  3. Put the ESX host in question into service mode – you’ll need to reboot it to perform the move, and you’ll need local access as it won’t reboot to a point where you have ssh.
  4. Make a backup copy of /etc/vmware/esx.conf in case you make a boo-boo.
  5. Edit /etc/vmware/esx.conf and change the path for the “/boot/cosvmdk” option to point to the new Datastore you recorded in #2. Save the conf file.
  6. Reboot the server. It will go smoothly until it hits the point where it attempts to mount the COS – at this point, it will choke as it can’t find esxconsole in the new place you told it to look. At this point, you’ll get a shell prompt.
  7. Do a recursive copy of the esxconsole-<uuid> directory from its old location to the new location. You should have all your /vmfs/volumes mounted since this takes place in the initialization sequence before the COS is mounted. [UPDATE] Jim points out that while local and FC storage will be available, it looks like iSCSI mounts take place later in the boot process, so they will not. Just a heads up if you’re planning on moving your COS to/from iSCSI [END UPDATE]
  8. Reboot. It should boot back up completely at this point. Ensure life is good, and then delete the old copy of the esxconsole-<uuid> directory.
  9. Ensure ESX automatically updated any other values to the new path (like /adv/Misc/CosCorefile)

Please don’t hesitate to comment with your experiences or if you know a better way to handle this (or if this solution could cause issues). Good luck!

Apology! News, and a New Code Viewer

First off, I want to apologize about the long hiatus away from the blog (looks like since August). The job took over a bit, plus I’ve been in the thick of developing a new commercial Blackberry game, doing some other projects, developing a raging Friday-night Oblivion addiction (such a good game), etc. I’ve been mentally keeping track of al the articles I want to write, so they’ll be coming soon.

Also, speaking of the new game – its coming along pretty nicely! More on that later.

I’ve also installed a better code viewer on the blog, and have converted (I believe) all the code segments over to use this. It’s a little easier to read, shows line numbers, and also has buttons for viewing the code in a popup window (plain text, easy for reading/copying), and printing. I think it will work out a lot better than the old one – I wasn’t a fan.

Additionally, I’ve created a “Blackberry” category, since there are multiple articles related to programming the Blackberry now available on the site.

Lastly, I hope to see all you North East gamers at this year’s Digital Overload LAN party. If you haven’t signed up, registration is still open for 12 more days. I’ve been going for a few years, and it’s always a ton of fun!

IAS Shared Secrets Aren’t So Secret

Though by night I practice in the dark arts of computer science and engineering, during the day I play the part of a mild mannered network administrator. Recently I was taking stock of our backups, and as I was looking through some items that needed to be included in the nightly routine, I checked out our IAS server. We run IAS as we have a number of RADIUS clients, such as switches and other devices, that we like to have authenticate against our Active Directory. RADIUS connected to AD via IAS is super sweet, as there are quite a number of devices out there that support RADIUS, and you can get pretty detailed with the authentication rules of what is and isn’t granted access.

In IAS, to establish trust between the server and the RADIUS client, an administrator sets up a shared secret – basically a password that both ends agree to use to prove they are who they say they are during communication. Normally, you would expect such a password to at least be encrypted, or at least obfuscated in some manner to add a level of protection to snooping eyes. Microsoft has however, to my surprise, decided not take this route.

Viewing Shared Secrets

IAS stores its settings in two files under C:\windows\system32\ias – ias.mdb and dnary.mdb. If you’re a database user, you’ll notice mdb being the file extension used by Jet/Access databases. For the heck of it, being a tinkerer, I decided to link to these files with MS Access and see what I could see. They are indeed standard Jet databases – which is pretty neat from an integration perspective – with a simple ODBC connection you can read/write your IAS settings. There is a table called “Objects” that contains an entry for each one of your RADIUS clients. What was a little surprising, however, is there is a field labeled “Shared Secret” that contains, in very clear text, the shared secret password for each RADIUS client.

Now while users shouldn’t have access to this file normally, having a big, easy to use database full of passwords always makes me a bit nervous. Understandably hashing might not have been an option due to the need to deduce the original cleartext – but where authentication is involved, a little encryption would be nice, to at least dissuade the average script kiddie.

Not the security hole of the century, but certainly something to be aware of.

Blackberry Tour Owners – What Do You Think?

Blackberry TourI have quite a lot of RIM and Blackberry topics swirling around in my head – but those can wait for another day and blog post. I got my Tour a few days ago, and I have to say: I absolutely LOVE it. And though I’ll be the first to admit, I’m a die-hard Crackberry fan, through and through, the device does have some issues (AHEM WI-FI – also, the back is kind of hard to open, I think). However, I really think it’s some much needed love for the CDMA networks, and combines together some great aspects of the Storm, the 8900, and the Bold. It’s definitely an improvement over my 8830, which had seen much better days. It’s nice to have a camera finally, and the speed if phenomenal. I couldn’t have more than a handful of MP3s on my 8830 because the media player was just too slow to categorize. I bought a 16gig micro SD card and loaded that bad-boy up with about 1000 MP3s, and the 9630 didn’t even blink. So sweet.

Any other Tour owners out there, or people hoping to buy the Tour soon? What do you think? Likes, dislikes? What do you think of the keyboard and more recessed trackball?

ALSO, if you haven’t yet, get the beta release of the Blackberry Messenger 5.0 – it’s AWESOME. Avatars, barcode friend adding, proximity to friends, etc. Check out the full details on CrackBerry.com